Thursday, December 8, 2011

Two For Ones Purely Practical Legwarmers


When we think of legwarmers, we often think of scrunched up fashion accessories worn around the ankles over tights.  While you can certainly do that with these, they were conceived to wear under jeans or business pants for warmth and to stay up so you don't have to fuss and fiddle with them throughout the day. 

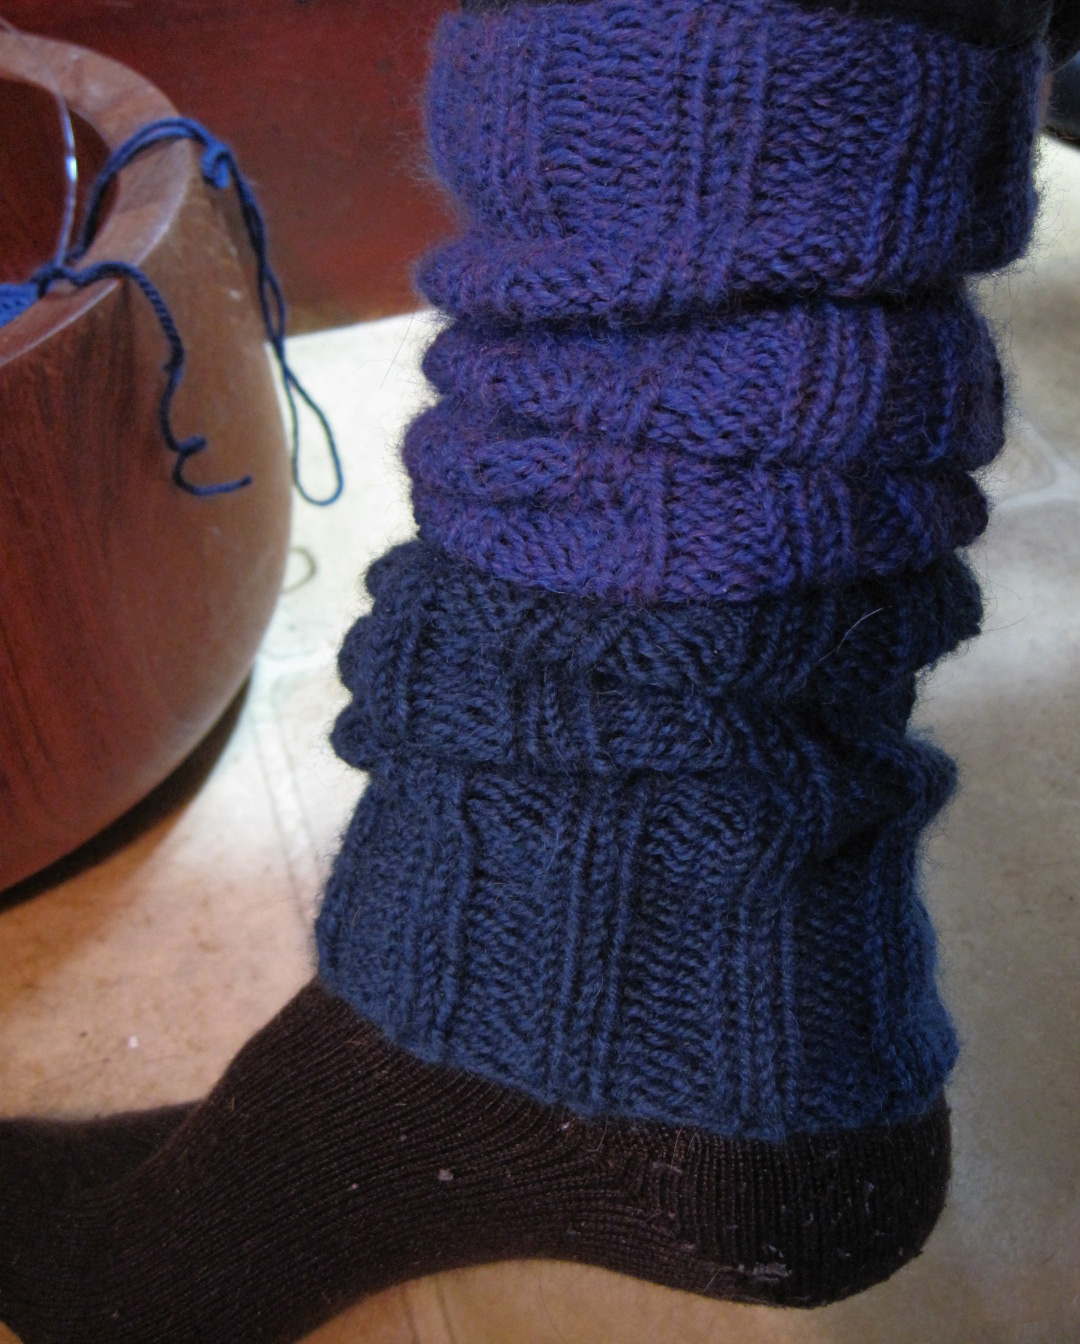
Having made one pair last winter and finding I was living in them, I wanted more colors because they can be seen when you sit down and cross your legs (hence socks coming in different colors).  But I didn't want to make that many pairs.  Therefore, these are 2-toned so I could wear them with either color at the bottom.  I don't wear mine on the outside so I didn't care how I paired my colors, but if you do, just pair compatible colors because they look good out too.

These are meant to fit a bit snug, consequently they also serve as what older folks will recall as "support hose."  They just feel reeeeeally good. 

While you wouldn't think that two tubes would require much thought, this pattern is more a discussion of ribbing behavior and fit than just the "how to" knitting directions so that whatever size you are, yours can fit and stay up as well as mine do. 

Mais Voila.  Mindless TV knitting.


Sort of like knee socks except without the feet so they don't have to be washed every wearing.
Worn so bottoms will show over shoes (above photo)

OR worn higher up so they won't show at all.

Or scrunched over tights if compatible colors are used.


SIZE:  Since gauge is impossibly inaccurate on ribbing, the pattern as written comes out perfectly for the following measurements... use this as a stitch/measurement ratio if you need to adjust number of stitches up or down for your size (further discussed below):
Measured with foot flat on floor and sitting down, this is for calf size 12 inches around at widest point, and 13" long from crook of knee to bottom of ankle bone.  There's upsize width leeway built in if using needle sizes 6 and 7, but if your calf is significantly larger, you might want to add stitches (pattern is 4-stitch repeat).  If your calf is less than 12" you would subtract in 4-st increments or go down on needle sizes, or both.   

WHY TWO NEEDLE SIZES:  I found that a little ease at the bottom keeps these from rolling up if you want to wear them at clog-top length.  (It does not lay loosely or add bulk if you don't want them showing at all.)  At the same time, that same amount of ease at the top keeps them from being binding at the crook of your knee and rolling down.  So at both ends, the same ease works well, but for different reasons.  Also, just FYI it is not the tightness at the top that holds these in place, but the snuginess around your calf, which beats a 1-point stranglehold any day. 

   In the instructions, I'm using needle sizes 6 and 7 but I knit on the tight side.  By dropping down a size (needle sizes 5 and 6) that also works if I want a little snugger fit for added support. If you knit at all loose, definitely use the smaller set of needles.

EASY PEASY PATTERN for the stated leg measurements (or to be adjusted for you, as described above):
      Cast on 40 sts somewhat loosely onto the larger DPN needles (or 40" circulars if using Magic Loop) and join in the round, knitting 2x2 ribbing (k2, p2) for 20-25 rounds. Switch to smaller size needles and continue in 2x2 ribbing until half the total length that you’ll want from crook of knee to top of where a clog shoe top would be (*DO see important note below re determining that length*.  For the above leg measurements, that halfway point would be a total of 9 inches of knitted length for a 13" long span).
     Switch to second color and continue 2x2 ribbing on same needles with new color for the same #rows (mirrored).  And, of course, approx. 20-25 rows before anticipated finish, switch back to larger needles and knit until you have a mirrored duplicate of the entire first half.  (If you misjudged and discover you want to make them longer, no problem.  It makes no difference if there's more length in one color than the other.)
      BIND OFF: Absolutely, truly, take-it-from-experience, consider using Jeny’s Surprisingly Stretchy Bindoff, an excellent video, and do it with medium-to-slightly-loose tension.  I have used Zimmerman’s Sewn Bindoff and this is so much easier and faster.

This bindoff (for socks, mitts, etc.) looks like this.  As you can see, it respects the ins and outs of ribbing very well.

**VERY IMPORTANT NOTE RE LENGTH:**   If you want these to stay up without fussing with them throughout the day, do heed this.  When these stretch widthwise over your leg... and they are meant to stretch quite a fair bit, they WILL shorten lengthwise, and significantly so (like over 30%!).  So do try them on as you go to see how many of your rows settles in to x number inches.  Wear them for a while, because you'll have pulled them taut when putting them on.  The trick is to know how they measure after they settle in to whatever length that many rows wants to be.  If erring in any direction, err on the side of long.

YARN:  Use any worsted wool you want, but I am totally sold on Berroco Ultra Alpaca for these.  (No association or connection with the company).  My reasons -- it has such great bounce-back when knitted up. I also find this yarn to be warm but not hot when inside.  I'm somewhat wool sensitive, and it's not one bit itchy.  (I thought it might when I felt it in the skein but it knits of soft and non-itchy, plus very soft and squishy.  Ultra Alpaca is also a joy to work with, not at all splitty.  It comes in 38 colors and Berroco uses very good quality fibers.  Finally, dollarwise it's a great value in terms of quality and amount for the price.  So those are all my reasons for such a plug on using this particular yarn for these. As a bonus, though, with 215 yards per skein and only approx. 120 yds. per color needed for the legwarmers, that leaves me enough yarn left over for a pair of Maine Morning Mitts (free pattern on Ravelry) in each color.  I got mine at Yarn and Fiber Company in Derry, NH which has a ton of colors in stock, reasonable pricing and as far as I know, they often don't even charge shipping. (Do still check if you call them or order from their website).  And I have to mention it -- though Cascade Lana d'Oro worsted has the same 50/50 alpaca/wool content and appears interchangeable, having knitted a pair of mitts out of it, it's no substitute IMHO for a ribbed project that needs bounce back.  It's a looser ply, somewhat splitty to work with and it just does not knit up with anywhere near the same heft or memory.   

One final note:  If you make these and do a project page on Ravelry, please link them to my Ravelry main pattern page.  I love these just as is, but would be thrilled to see any modifications that others might decide to make too.  

Sunday, November 20, 2011

Two Quickie Yum-Yums

Blueberry Tart-like Thingie
When we had the power outage I lost all the meats and any other iffy things.  I had several packages of frozen berries, one of which had been in there long enough to dump, but after that hit the bin I reconsidered two bags of blueberries.  I mean, the worst that would happen is they'd be refrozen into a block of ice which wouldn't help the taste any, but it was worth seeing about.  It turned out they were fine, but I had to defrost a bag (and a whole bag) to find that out.  So now what do you do with 2.5+ cups Maine Wild Blueberries?


I've always snubbed my nose at readymade pie shells, but didn't want to invest the time to make a crust on an experiment, so picked up a package of two refrigerated Pillsbury pie crusts (usually parked somewhere near the refrigerator rolls).  Then I found out thata for a real blueberry pie, you need 6C fruit.  So modifying downward from a random recipe I found on the web, I threw together a proportionate amount of ingredients, and THIS TURNED OUT GREAT!

Since there isn't enough fruit to fill a whole pie shell, I just piled them in the middle and folded over the sides.  Loved it.  The whole thing takes... mmmm, maybe 3 minutes of active time to make.  If that.

How to:
Thaw one package frozen Wyman's Maine Wild Blueberries, right in the package.  Once fully thawed, they produce juice.  Drain all juice, reserving for another use (like letting the kids drink it, it's full of tons of antioxidants) and plunk thawed, drainked blueberries into a bowl.  Pillsbury refrigerated pie crusts work well here (I'm generally a pie crust snob but they are great here).  Remove pie crust from fridge for 10 minutes to sit at room temp while preheating oven to 425.

Mix together 1/3C sugar, 1-1/2 Tbsp. cornstarch, 2 pinches (1/8tsp) salt and 1/4teasp. cinnamon or thereabouts.  Can add a grating of nutmeg too.  Sprinkle over blueberries and fold into berries gently, being careful not to smash.  Unroll and lay out pie shell onto glass pie pan but don't pat down edges to fit into edges of pan.  You can use just a tad of butter or Crisco to grease pan, but half the time I don't.  Dump in blueberry mixture right in the middle and fold up sides of shell to contain.  Bake 10-20 minutes until crust edges are golden brown and blueberries are bubbling.  Remove from oven and cool in pie pan 10 minutes on a rack.  Optional:  Carefully and gently slip a spatula under bottom of tart as though to lift, then position it higher with a prop for better cooling.  Or just leave it to cool, that works too. 
Talk about quickie no-brainer pastry, it's almost criminal that it looks and tastes as though someone took hours on this.

And then there's this Dutch Baby(Recipe is not my invention or unvention)

This is a nice breakfast thing when you want a treat.  No two rise into the same shape.  Some puff up like the one in the photos, sometimes they form themselves into a bowl-like shape.  I didn't photo this one with the powdered sugar and lemon juice (both musts) that you add before you eat it, this is just to show my sis what it looks like when done.  The following size serves one.  To serve two (or a couple kids and an adult), double recipe and use a 10" Pyrex type glass pie dish.  (Not sure how this would come out using metal, it doesn't retain heat the same as glass or stoneware.)

Ready to come out of the oven...  after it has risen into whatever shape it's going to take (varies), edges are browned and crispy, and the center is "set" (which means the center is no longer bubbling).

After it's out of the oven, in more realistic light 

How to:
Stick smallish shallow baking dish or individual casserole dish (mine is 6" x 7.5" interior dimensions) into oven and preheat dish to 375-400 degrees along with oven.  When oven is at temperature, gently whisk 1 beaten egg, add 1/3C half and half to combine and then add 1/3C flour.  Whisk just until smooth.  Remove dish from oven and grease sides and bottom with a half pat of butter.  Enter batter.  Put back into hot oven, set timer for 10 minutes, after which you start keeping an eye on it.  (Kids like to watch it rise.)  Remove when edges are browned and center looks set, like in photos (no bubbling).  It will fall a tad flatter which is fine.  Serve immediately, BUT to serve (and do not omit either of these!) squeeze fresh lemon juice (please, fresh!) all over the thing, like way more than you'd think, especially on the edges.  Then sprinkle a LOT of powdered sugar all over it, and I mean a lot!  It should look like fried dough at country fairs.  Eat with a fork.  It's surprisingly filling.  Goes absolutely GREAT with a chaser of orange juice and coffee after.  Easy clean-up too, it makes no mess to prepare. 

Saturday, October 22, 2011

Update Session, Recent Projects

LATEST AND PRACTICAL

Once again, winter comes.  Funny, when it's winter, I can't even picture summer.  And vice versa.  But now that I've been reminded that a very drafty old New England farmhouse will be in the near future, it dawned on me that drafts tend to run low to the ground, and my lower legs are always cold.  My at-home winter wardrobe consists of men's PJ bottoms in flannel; but as of this year, a fleecy flannel, the legs of which are way too big and too long.  So to kill two birds (horrible analogy), I made a pair of gaitors out of Berroco Peruvia Quick (a super bulky yarn) to wear over the pant legs.  They'd keep them off the ground and close them off at the bottom, but then also keep my lower legs toasty.  These sucker are 19" long so they can be rumpled a-la-slouchy (hides the bulky folded flannel underneath) and I also wanted length for a foldover cuff at the top.  The bottoms, I wanted slightly flared just in the front so they'd span over the arch of foot and not ride up.  So first photos, then pattern...


(ETA:  SEE CORRECTIONS BELOW.)  I used Berroco Peruvia Quick (2 skeins) and 3 needle sizes, US10.5, US10 and US9.  Cast on 36 sts onto US10.5 needles, join in the round and do 2x2 ribbing (k2, p2) for 5 inches (top).  Switch to size US10 and continue another 2-3 inches.  Switch to US9 and continue until long enough, depending on whether you want slouchy or not.  Stop when you are at the point where leg meets foot.  Create flare to accommodate top arch of foot.  (Becomes important if wearing over fitted boots, but also fills in the gap if wearing slippers or clogs).  To create that flare, on four consecutive K2 columns, do the following:  K1, M1R, K1, P2 and repeat one time.  K1, M1L, K1, P2 and repeat one time.  This gives you 40 sts now because with those increases, you've created 3x2 (K3, P2) ribbing on four ribs which will be worn in the front.  Follow stitch pattern for another inch or so, then bind off using Jeny's "Surprisingly Stretchy Bindoff" which can be found on youtube with "that" search criteria, and choose the video done by Cat Bordhi, one of my all time favorite teachers. Et voila!  Warm legs.  They kind of look like English riding half chaps (where I got the front arch flare idea). 
These are stretching out a bit from on/off-ing them.  No biggie, that's what elastic thread was invented for, but if doing over, I would likely cut down to one or two less ribbing sets AND I would also use smaller needle sizes, and I'm not so sure there's any reason to vary needle size.  I think I'd use a size US8 needle and cast on 32 sts if, say, a 12" calf at the widest point, measured while standing.  I'd try on after a couple inches knitted, aiming for a smooth slide over heel/arch point of foot, but not with a whole lotta leeway.  Say a smooth but snug slide over that humpy part.  All else regarding these stands, as written.
I'm so enamoured of these that I bought yarn yesterday in a less bulky (but still bulky) weight to make some that I can wear over bare skin under jeans.  I know, worsted would have done it, but I can only take so much knitting of tubes, maybe it'll go faster.  I'm going to use size 7 needles on those because now that I'm learning a bit about ribbing, the trick to maximizing elasticity is small needle-to-yarn ratio, and everyone seems to think that 2x2 ribbing has the most aggressive bounce back.  ETA:  Used worsted weight Berroco Ultra Alpaca, started with US7 and dropped down to US6 for that grist yarn. They are WIP (works in progress) as of this writing.

But I LOVE these dumb things.  I never realized what a difference warm calves make in cold weather in terms of your overall comfort level.  And since I'm practicing being an old lady, I'm already seeing that things like that just feel really nice. 
  
MY FIRST GRAMMY KNIT...  While this was a very tedious knit (all 10-stitch rows, each picked up from the preceding column, mitered corners done via shortrowing, the whole knitted in a continuous spiral) the finished result was absolutely worth it.  To make this a really large blanket would have been difficult because it's fingering weight yarn on a size 4 needle, namely Crystal Palace Mini Mochi.  Rather than go beyond my point of loving to work on it and into where it represented a chore, I didn't want that association, so stopped at 26" square which makes a perfect size for a car seat blankie because much bigger and tucking in becomes a hassle.  Daughter picked out the yarn and colorway, and says she has gotten compliments on it already.  I still have 2 more skeins which I will hold aside in my yarn stash, in case Squeak makes it her bankie, in which case I can add to it at any point and make it bigger.  

Several photos of this because it does such amazing things in different lights.

Shot from above (back side where you can see seam joins)

Shot at an angle

And sometimes it glows...


While under construction (shows how it's done)

MY SECOND GRAMMY KNIT...  I'm having "second sock syndrome" about the other one, but it's going to be a while before she will be big enough for them anyway, so there's time. 

No pastels for this little kidlet...


THIRD GRAMMY KNIT (EXCEPT IT'S CROCHET): 
Learning crochet because I wanted to make her this hat (part of a photo op set).  The yarn might be too thick for that, but might work for a to-be-worn hat.  Will see.  In any event, it was practice crocheting.


FIRST CARDIGAN
So this is how it goes.  I hate spending time on something that won't work out.  I read TONS of feedback comments on the Central Park Hoodie to find out what any complaints were, and it was time well spent.  They included "sleeves too tight" and "this pattern runs small."  But then there were just enough (barely, but they were there) where people said "great fit."  (Doh?)  Try as I might, I couldn't establish who swatched for gauge and who didn't, so I checked MY gauge and even washed my swatch.  Revised pattern so it WOULD fit. 

I LOVE this sweater and I wear it all the time.  I used Berroco Ultra Alpaca which is a soft, squishy, wonderful yarn.  I even got the sleeve length I wanted, which isn't always easy to dope out because (a) it's really hard to measure that on yourself; and (b) everything changes once the pieces are seamed together.  But hey, some luck too.  ;-)   I only have the zipper basted in (still!) so it has the wonky-ness at the bottom, but I know how to fix that.  Turns out you CAN ram a needle right through that hard plastic coated bottom zipper stop tab.  Yay.  Until then though.... 


I have another CPH finished and seamed together.  All that's standing between it being in a UFO bag (knitspeak for "unfinished object") and wearable is the button bands and collar.  On that one (more fitted, with waist shaping), I want buttons.  I'm researching the best buttonholes.

HATS:

One for me, sort of a 1920s look.  Not great in an icy wind because the seed stitch used on the band has holes.  Otherwise though, very warm, and it does pretty well with not giving too bad of "hat hair."

Liked it enough to do one for Jenny in her color ranges (jealous, I just can't wear this color)

This one really works great.  Sort of a baseball cap. 
Does not give "hat hair."  Does keep rain off my glasses.  Yay.


____________________________

AN UNFINISHED PROJECT THAT'S BEEN PARKED.... 
I have a warped button band on this, and I will never be happy with it as is, so I have to frog it out.  That is not a minor thing.  Both button bands AND the collar are all knitted in one piece and attached stitch by stitch as you go.  Not only that, button band and collar also have facing.  Arg! 

As for the way the collar inside corners miter together, I also don't like the original pattern because it only works if the collar is worn as a stand-up.  I want to fold mine down.  I might have to wait on getting that figured out until my design skills are farther along, because what I want to do is above my head at this point.  

Additionally, sleeves not done yet.  (Those have to be re-designed also, I started one and the original pattern just misses the boat.) 

This is what I don't like about the construction of the collar's facing.
If worn folded down and open, the inside corner is just flat out wonky. 
______________________________

SCARVES:  Two for now...

A very simple but lovely stitch pattern called Feather and Fan and also called Old Shale lace,
I bought a single skein of a very lovely CASHMERE yarn.  There's just nothing like cashmere.
Ridiculously expensive yarn, so it's not a long scarf.  It's a length you'd wear inside your coat.  But that's how I wanted it anyway, so it works out. 


_____________________

And my latest contribution to scarfdom, this is the first mohair I have ever put near my skin that didn't itch to death.  It doesn't itch at all.  LOVE it!  Warm, snuggly and not run-of-the mill.  We are talking a LOT of tail ends to weave in.  Every six rows, in fact.  23 x 2 = 46 tail ends and then some. 

While it took two skeins of the mohair, the other yarn is Lana d'Oro Alpaca (worsted) and I am low on what I want to be a big fingerless mitts wardrobe, so made a pair from that yarn.  Matchie matchie!  But hey, they are soooo soft, they'll also be nice and warm.  To me, fingerless mitts are just the way to go. 


During construction and a better representation of the actual colors in some lights...

An even better photo for the real colors.  The changes very subtly done...


Sunday, October 2, 2011

A Shawl For My Sis

Last week my sister had a key birthday.  Her favorite color is Periwinkle. 

Meanwhile, I had gotten "The Shawl Bug" which seems to happen sooner and later to spinners and knitters.  And after a lot of obsessing, THIS shawl is something I'm thrilled with.  The reason is... well, long story short, the first shawl I made was a disaster.  I liked the looks of it in terms of stitch pattern, but it had the same problems I've found in just about every other knitted shawl I've tried on, and that's a LOT.  (All yarn stores seem to have a zillion of them hanging around, and you betchum that I've tried on all of them.)  They just don't fit!  They don't want to stay on at the best, and at the worst, you have to fight off the antithetical build of their shape just to get them to wrap around you, and then all they want to do is find a way to fall off.  Talk about frustration no one needs.

So after I made that shawl, I hated it.  It was too small (partly my fault but not entirely).  But then also, while it met in the middle at the neck (almost, okay, it really didn't), the front edges just spread out from there on down so that it was just not flattering at all. 

So I frogged the whole thing, just sat there unraveling hours of work.  And started over, this time with a calculator and a whole lotta measuring and picturing the dynamics of "hang."  So I kept the stitch pattern design.  Totally changed the build.  I was semi-happy with it, actually more than semi, but not entirely.  But it served as my prototype from which to make more modifications.

And voila.  The second one I made was this one for my sis, and THIS one FITS!!  Also, to make it tailored to my sister's size and lengths, I sneakily got measurements by asking her to play "dress form" on the shawl I was re-making for me (after frogging the whole above first try).  She never knew I was taking her measurements, not the shawl's. 

So here it is.  I couldn't be happier with how it turned out.  It stays put.  It meets in the middle in your choice of two places (high neck or lower V), and it keeps meeting in the middle all the way down.  Yes, yes, finally Yesss!!  I also added some moving room on the sides (where arms DO exist and move around, hello?)
All her kids came with families except those who couldn't because of distance.  We all brought a dish including a super tasty birthday cake made by her Daughter #1, and yours truly spent a full day going through zillions of 1940's music to ferret out 2 hours worth of music by original artists (Mills Brothers, Inkspots, Earl Bostic, Andrews Sisters and the like) into a master mix, each and every one of them being music we both grew up with during the very happy childhood times.  Many were among the "Our Songs" of our parents, all stuff we listened to daily when Sis was 3-10 years old.  Jenny gave her a hand woven project for her kitchen which I happen to know hits the spot on Sis's taste, and Sis's #1 Daughter also put together a phenomenal picture book where every page spread was themed around each person in her life, whose HANDWRITING appeared in letter form, each telling stories about times with her that were so meaningful to them.

It turned out to be a pretty amazing birthday day, not only for Sis but for all of us.  Very much like old times, with something very magical about the whole day, from start to finish.  If you believe in Sainthood, my Sis is one of those.  Dusty sense of humor and all.

A New Chapter... Cloud Horse Re-homed

UPDATE NOTE, added 10/27/11.  I'm leaving this post intact so it will remind me just how wrong I was.  I've always been a great reader of people, and must have gotten cocky.  I gave them a horse on 9/20 who was in perfect condition (I have videos of her cantering happily with each of them riding her, taken 2 days prior).  With every term on the contract having been defaulted upon, and more egregious defaults on the horizon, I got wind of it all and took repossession of Cloud on 10/19, just 29 days later.  Horse was rendered lame.  Details cannot be gotten from anyone as to how she showed that, but I got plenty of details how my "stellar new owners" know NOTHING about responsible horse care.  Lies, lies and more lies.    And everything I've learned about them since just spells very, very irresponsible, and beyond stupid, people.  Some of the things she did with my horse just defy rudimentary common sense.  Next time, I will dig a little for real references and ask very specific questions.  I got royally and expensively duped, and my horse got royally messed up.  

So this post stays, just as written originally.  I need to re-read it a thousand times to tune into any signs I could have seen.  My only excuse to myself is that this woman is a very accomplished liar.  Can't believe I didn't see some sign. 

 _____________________________     

A bittersweet decision. 

There comes a time in life where you have to give something up, not because you want to, but because continuing to do it is just getting harder to maintain.  Sometimes it's because not giving it up becomes selfish.  And sometimes, it's just the smart thing to do from a standpoint of common sense.  Any of those reasons can be independent of the others, but in this case, all three were becoming undeniable realities. 

I knew it was time to find Cloud a new home.  I kept putting it off.  Didn't advertise.  Didn't want to deal with it.  Didn't want to give up what was.  But as well as Cloud did as an only horse while she was being trailered to trails and outings, at a point she started becoming a lonely horse, because she wasn't.  The guilt in seeing that happening is crushing.

First of all, meet Cloud.  Photo taken 3 months ago.  Trotting in for afternoon yummies, nickering the whole way...

    It's pretty hard to believe that this horse is at the higher end of 23 years old.  Beautiful registered Paint, great blood lines, bred by a physician whose hobby was breeding horses, she has gorgeous blue eyes, to boot.  Stunning under gait for an older gal, unusually straight, strong top line, outstanding health and soundness.  Now add extremely well trained, responds to English as well as the most sensitive Western neck reining and other cues, responds to those as well as verbals only, loads herself in and out of trailers of any type, great on the trails, will go into water, over/under bridges, climb rocks, and if you canter her next to another horse, she thinks it's off to the races and her stride widens so she flies.  Fun spirit.  And an absolute shame to allow to stand around, languishing day in, day out.  All that highly desireable stuff, going to waste. 

New owner came along, a better situation for Cloud than I could have designed from a wish list.  A solid, young family of horse lovers, where Mom is very experienced and has her own horse, Dad isn't as experienced but not ashamed of that, and a gentle, sensitive man.  Mom works at a boarding/training facility where there are 17 other horses in fantastic accommodations from a horse's standpoint.  Beautiful corrals with run-ins, stalls if needed, bathing station, outdoor training arenas, one bare, one with obstacles to learn on, and miles of gorgeous wide trails with great footing.  Cloud will be Dad's horse, and he's 5-8, weighs 150 which is a great size for a 15:3HH horse Cloud's age.  And Mom is not only there on property every day, but a Vet Tech to boot.  I really like these people.  She could easily be my daughter and he could easily be my son in law.

Money?  Got very little.  I know, and they know that Cloud is worth over 5 times what we ended up at.  It wasn't their opinion of her value, just finances.  They'd just bought their daughter a horse at the same time, and it turns out that he might need some special medical care.  I'd set a low price to start with, specifically so I could have a big choice of homes, but we ended up at 1/3rd of that.  Instead, we worked it out that I can still ride Cloud from time to time for a while.  It gives me a soft landing on hanging up my reins.  And since I'm easy to ride with, and Mom would be also, it's an easy condition for Mom to satisfy.  She got a great deal, Cloud got a great deal.  And actually, so did I, in the form of knowing a horse who's meant a lot to me, is getting a phenomenal situation. 

Yeah, I really like these people, and trusted them by gut feeling the second I met them, as well as everything I've seen since then, which is a fair bit.  It just doesn't get better than that.

Tuesday, September 13, 2011

So Now, A "Quick Little Shawlette"

I have baby things to work on, but while shawls were on my mind, I just had to knock off what's called a "shawlette" because it's not a body wrap, or even much of a shoulder wrap.  Well, yeah, it's a short shoulder wrap.  Small enough to also serve as a scarf.  Except some of them that'll serve as a shoulder wrap are really too big to truly wear as a scarf.

I wanted a scarf type.  And I also wanted to try another pattern.  I kept hearing about Summer Flies on Ravelry.  It's a pretty little pattern, and I must say, it's very well written.  Most importantly, its section organization is delineated and makes sense. 

I followed the pattern "as written" up until the very last section, and that was the only thing I didn't like about it.  The designer doubles the #stitches in order to make a ruffle, which I didn't want, and also it's straight stockinette.  Sort of.  A little too heavy for the rest of the fabric type.

Another Rav member created an alternate last section, much lacier.  But she kept the huge #stitches.  From that (and this happens all the time), yet a 3rd Rav member took her lace pattern, but designed it in keeping with the established number of stitches so it's not ruffled (and lacy).  It's just lacy.

I screwed it up.  The eyelets are designed to alternate positions, and in the process, they create a lovely design.  I knitted Row 7 in place of Row 5 (therefore no alternated eyelets, instead just a really stupid repeat).  I couldn't face frogging it, so just went on to Row 9, and thought it might look like it had some organization to it if I threw in Row 11.  It improved it some, but I quit there and bound off. 

Sure 'nuff, it's not big enough to be a shoulder cover (well, barely, barely, it actually is, but I mean barely literally).  It's going to make a GREAT scarfy thing though.  I named it "Brown Neck Thingie." 

Love this little thing.  To be worn over a t-shirt with jeans.  Or whatever.  I love that about today's style sense.  It's the "whatever" that's so fun.

Anyway, here 'tis.  It's on the blocking mat, under the pins.  It retracted some once off the pins (knew it would) but still retained enough width for the way I'm going to wear it.  This yarn is Malabrigo Sock Yarn.  I don't think I'd ever use it for socks, but that's for the very reason it's perfect for shawls and shawlettes, scarves, cowls, etc.  Its twist is not tight enough to be sturdy for socks, which means it produces a soft, squishy, more vulnerable yarn.  Malabrigo is a smallish family operation.  Some people say their dyeing is so vibrant and intense because they oversaturate, and that Malabrigo projects will fade.  Well, this is the 3rd time I've used Malabrigo, and very vibrant colors, and I got so little dye runoff that it was a joke.  Granted, cold water only.  I'm not going to push my luck. 

This is a gorgeous colorway.  Vaariegated browns range from tan to very dark, rich chocolate (literally the food), interspersed with blotches of oranges and greens.  Not my normal color ranges, but that's part of why I chose it.  I really like the idea of sometimes choosing something that's out of your comfort zone.  Because it's a total change.  And also because who knows, you might surprise yourself with a new found friend (another color scheme).  I'm doing that right now with browns.  Purples were last.  I went from hating them to... still have to think of it as an acquired taste.  I'm acquiring it.  Even dabbling in lime green (horrors!)  Fuscia... I just don't think I'll ever be able to go there.  I really don't.  But I'm learning to never say never. 

Fuschia.  (Shudder.)

Off the pins and as it lives:
Inside curve:  40"
Outside curve:  63"
Depth at Center:  11"


WOW!  I just discovered that if you click on the photo, it greys out which first is grounds for a pissoff.  But if you look above or below that, there's now a menu that gives you a choice of sizes to view the photo in.  I mean, that is definitely an interesting aspect of Blogspot's new formatting.  Huh.  Interesting.

I Got the Lace Shawl Bug

Well, after the typical beginning of scarves, then hats, then fingerless mittens, then cardigans (will catch up on the latter later), I'm now smitten by shawls. And specifically lace shawls.

First, I have to say that up until recently I could not figure out why anyone would knit a shawl at all, since there are about as many stitches in one as there are in a sweater. Well, maybe not quite, but a sweater is more practical. Except if you're reading in bed and your shoulders are cold. Because then when you find yourself waking up with your Kindle on your stomach, "sleep screen" having long come on, and a crook in your neck because you fell asleep mid-sentence somewhere, you can just whisk a shawl off without sleeves getting in your way, and turn off the light.

Then I realized that shawls are just fun to make. Often they're lace which is both fun and frustrating. Lace knitting is often painstaking, I can already tell. But so many people do it, I know that it gets easier. I need to get comfortable with charts, because I think they're terrifying until you get used to them. I don't know, however, that I'll ever be one of those who wants to knit where every stitch is different, and let's throw in a couple of bobbles. NOT!

Okay, leave it to me to find something to bitch about. In this case, I already know that it's fit. I have been in several yarn stores, all of which love to show off their lace shawls. They're everywhere. Draped over couches, manequins (sp?), artfully strewn across tops of shelves, hanging on walls... sort of like patchwork quilts. They're pieces of art. However I've tried tons of them on, and all they want to do is fall off. They are beautiful spread out, wing tip to wing tip, but they aren't built to wrap around a sphere, let alone one with the architectural complexities of shoulders with a neck sticking out of them. Almost all the triangular shawls I've seen have a hump at the neck (should be concave because even a straight across hypotenuse doesn't wrap right). Then from there, the wings either go straight out (part of the straight hypotenuse) or (absolute insanity), they bend downward so the whole shawl looks like an eagle in a dive bomb configuration. This does not wrap around you, let alone stay put. Hah! You have to fight with it constantly to keep it on. And that's if you enjoy having it too small around your back. If you want to use a shawl pin, that'll trap it from falling off. But then you have huge gaps all around the neck because, once again, it's just not built to wrap around a sphere.

Onward to the circulars. Every one of them I've seen (and I've now looked at thousands of Project Pages) -- they might meet in the middle at the collar bone. Maaaaybe. But then they spread out wider and wider as they go down the front. This, of course, hides the boob area, but features the stomach. In fact, even if you have a flat stomach, it'll look pudgy under this A-shaped opening simply because the opening gets wider and wider (as though a pot belly is protruding through it).

So what I did was, I found a pattern that looked easy and quick. Relatively. It had potential. A circular shawl (half circle). I knew nothing about how a half circle would fit. Well, I just described it in the last paragraph. They don't fit well. Not only that, the finished project was stupidly small -- partly my fault, I used a smaller needle and a finer yarn than called for. I knew that, and I knew it would have issues. I tried to resolve those questions, but got frustrated with the advice I was getting, too. Listen to this: "Always trust the designer. If it doesn't turn out to be something you like, either gift it or frog it and try again."

Well, that was the prevailing logic I kept running into and it was maddening. More so from jealousy that obviously these people had nothing to do with their time except knit blindly, and then give away what they had or rip it back out again and just keep doing that over and over until finally MAYBE they would eventually stumble into something that worked. Very jealous. I don't have that kind of knitting time.

Anyway, I finished it "as written" and was very unhappy with it. Whereupon I vowed to enjoy the experience of frogging out HOURS of knitting, based on the premise that with every unraveled row, I would cement my resolve to understand shawl construction and do some serious surgery on that pattern until I would get something that fit around a sphere with protrusions sticking off of it.

First attempt: Things I like about it: It does not fit right "as is," but it definitely does if I fold over the center line and create a shawl collar. That's a start. Secondly, I abandoned the pattern's stitch count entirely. It called for a doubled stitch increase row on Row 20. It puckered.  Too many stitches that early.  So I moved my increase row farther down. Third, the original pattern simply didn't have enough stitches to go around (literally!)   Even the ones made with the right grist yarn don't lay right. Only one that I saw did. So I added a lot more stitches. (Didn't know the pi shawl formula yet, this was by guess and by gander).

However, I wanted to do them in more increments than the original simply because I did not feel secure in committing to X number of stitches and having it need to last for a repeated number of rows (same size section) but each time at a different placement in the cone.

I love the Fibonacci sequence, because it's throughout nature and we're used to seeing it everywhere, even though we don't notice it.  I mean, no one says, "Hey, look at the layers in the side of the mountain's rock formations. That's the Fibonacci number sequence! See it?"  We don't notice it, but it's everywhere. The one thing I will never argue with is nature.  These things don't happen overnight.  It takes millions of years.  And then throw in devine design, however you conceive of it.  I spaced my increase bands based on the Fibonacci sequence.  It's pretty, if nothing else. 

So here's that first attempt.

First, NOT folded.  As you see, it still makes the upside down V that's ever so NOT flattering to the female body!   And my expression reflects how I feel about that.  Do I look dumpy?  Forget the sour face.  Just look at the body.  I don't think I'm dumpy.  I definitely look dumpy here.
But FOLDED into a collar on the inside edge, voila!  Suddenly the shawl meets in the middle at the top and also keeps that vertical line.

Photo Note:  We will, for the time being, ignore that it is pulled too far forward so the front bottom edge looks poochy, it doesn't normally.  This was a windy day, we were very short on time and the shawl pin was whisked right off the LYS counter, "borrowed" for photo and unceremoniously jammed in cockeyed.  And customers were coming in, and the LYS owner was my photographer.  (That spells "quick photo, don't sweat the fine lining.")


And time out.  We will also ignore that unlike sourpuss expression in the first photo above, I am now smiling and standing just a tad less frumpily (new word). I'm acknowledging all that because of unfair influences.  Smiling vs. looking unhappy.  I'm thinking of those commercials where someone is doing something like dumping pasta out of a pot of water, and every cook knows how to do that, but in the commercial for selling a pot with a drainer hole on it, the "before" footage of that woman turns the old pot upside down about 2 feet over the sink so that pasta bloops right into the sink, and boiling water splashes everywhere.  She's frowning greatly, but mostly she's showing abject pain because she's burning the crap out of her hands and steam is melting her glasses, and then she also trips from jumping back too fast in pain -- all because she didn't have that drain pot that you can order, and if you order it in the next 5 minutes, you get seven of them (cough, choke...) "Free!!!, just pay separate shipping and handling!!" which is so overmarked that it pays for each and every one of the pots they stack up on your doorstep because now they're making their money on sheer volume because you can't buy just one.  And then we see her happily draining the pot, smiling to herself as though she's ever so clever, because all the water is coming out of a spout now, well away from her hands and nothing's melting her glasses because now she can see out of them.

So anyway, forget that I'm smiling and standing in the mimic of a model-y stance.

And this shows the thing laid out flat. 

As you see, it's still just a tad over a half circle. That's why it has to be folded at the inside edge...

Well, BONG!!  So what does that folding create? Bigger than a half-circle, that's for sure. Maybe somewhere between 5/8ths and 3/4.  Closer to 3/4.  That's all fine and good. 

HOWEVER!  There are other forces here. When you think about it, there are two angles involved in a shawl. One is the part that lays on your body. That goes from the neck to where a shoulder seam would land on a sweater. That's one hell of a high rate of increase. The circumference has a gigantic growth rate, in every inch from your collar bone downward about 3-4 inches. But once it gets to the point of your shoulder?  Wham.  The rate of increase suddenly changes. And now you have to add gravity because from that point on, the thing is no longer laying on your body, it's now hanging off of it.  Specifically, your shoulders.

I'm working on my second rendition of that same pattern now. That may seem boring, but hey, if I'm going to be screwing with proportions, the last thing I want to do is also vary the pattern.  I need something as a constant.  Just sayin'.

This one, however, takes the above into account with a little more methodology involved. And when I did the math on this one, I now had Elizabeth Zimmermann's pi shawl formula revealed to me.  Oh, was I EVER glad to find a math model to play with because I didn't know it existed before. (Time Out:  I love that Zimmermann woman. Too bad she had to die because if she were on Ravelry, she would RULE.) Cat Bordhi is one of my living heros. And since socks are where so many of her inventions come from, I just know that if I were a sock knitter, I'd be prostrate at her feet (secretly getting a closeup of her heel turns. She's brilliant.)

Once this second shawl is off my needles, wetted out, blocked and dry, I will definitely photo it because it won't be with me long since it's destined to live elsewhere. I hope I can deciper my construction design notes because so far, so good -- this sucker fits!  It plunks onto your shoulders, meets in the middle under the neck, and then it just keeps meeting in the middle with a vertical line down the front, all the way down. I also did some strategic placement of ganged up increases, and those are working out well too.  The other thing I did was veer from the formula by creating a wider starting point, then quickly reverting to a smaller math model for the rest of the computations.

I will be thrilled once I translate all my construction notes because I'm dying to see the percentages of increase at each point.  I have a feeling they might surprise me.  Some of this was still arrived at by guess and by gander because some of the questions I had were answered wrong, and I know that, I just don't know for sure whether they are partly right (and they may be).  I think, from what I've seen, there might be a lot of misinterpretation of EZ's pi shawl formula in a number of designs that are out there.

Shawl construction appears easy.
It is NOT. 
I would rather convert a dog sweater to a human sweater than tinker with shawl construction. No, I take it back. I would rather tinker with shawl construction because it's really challenging, at least to me.  And I am not brilliant so this is how I amuse myself. 

But when you think about it, nothing holds a shawl down or anchors it (e.g., sleeves).  A shawl's fit depends entirely on construction and the incremental proportions which define its shape.  Add to that, that every stitch you start with gets exponentially increased.  One stitch toward too many on Row 2 is going to become 16 sts by Row 50.  And add the angle changes on the body which changes the whole game?  And gravity entering into it part way along?  It's one of those things where, for it to fit right, naturally, that's the only way it really does fit right.  You can overpower a bad fit with shawl pins and folding away gaps, but that's what you're doing.  Overpowering a bad fit.

Tuesday, July 12, 2011

Stunning Yarn Seeks Soulmate Shawl Pattern

ME:
I'm a multi-colored Malabrigo Silky Merino yarn, DK weight and specifically 150yds per 50g. I'm absolutely gorgeous in person because I have a gentle sheen you can't see here, but this is a very good representation of my real colors.


I'm lightweight and soft to the touch right out of the gate, but once I'm washed I'm said to get downright floppy, and also have been known to grow some. My net worth comes to 900 yards, so material considerations are not an issue. I'm spun as a single and we single-spun yarns are known to be unbalanced, but my twist does not seem to be active so with the right shawl (probably any shawl), I should hang straight.

Long walks on the beach and snuggling up in front of the fireplace are fine, but I want to be at home with Jeans or Chinos and a T-shirt, and not look silly going in and out of a supermarket. I think I'd be very compatible for a lace-ISH pattern along the lines of feather & fan, but I could muddy up with an elaborate lace that's too yarnover-intensive. I do not consider myself ideally suited to stockinette, as I am prone to pooling issues.

YOU:
Built to fit, you're either circular, ranging somewhere between a half and three-quarter circle (seems ideal) OR you're triangular, but (ideally) gently rounded. In no event are you concave between points if triangular so that you have a drastic, boingy long skinny point in the back that hikes up high on the arms between back and side wing points. And an ABSOLUTE MUST! You are curved in some way at the neck so that you fit around shoulders nicely, and without unsightly gaps that require constant fussing or folding. In terms of fit, highest ratings are given to "maintenance free" fit.

As to personality, the ideal mate is at home being tucked under forearms but also just as happy with one side swung over the opposite shoulder. Ideal length seems mid-hip generally (if triangular, point can be lower), but between center back and wing points, you should be able to cover arms for the most part. Circular seems best suited for that, as long as one side can be secured without sacrificing coverage generally. ("Indian Chief Blanket" types would be considered, as long as Linus doesn't come to mind.

Since tastes are subjective, and adjectives leave a lot to interpretation, a picture says a thousand words.

This is one treatment I seem to be compatible with. Please note the lace to the left and right of the center stockinette fill-in. This lace appears to be an offshoot of the standard feather and fan. I do see YO 6 times, but I don't see three K2Tog, nor do I see any garter ridges separating the repeats. That seems to work, it's a very pretty lace, but I have no idea how to do it. (Photos are enlargeable for detail if you click. Sometimes you have to click twice.) Blogspot is glitchy sometimes - back button OR closing enlargement window.. it can vary.


Closer


And how that hangs

A view of wing tip on a sample, just FYI and for reference... Again, with the stockinette fill-in that was used.


Now, a little more about the massive amount of stockinette: Note the pooling?


Last but not least, you are NOT this shape!! This shape is perfect for hang gliding and stealth aircraft. Not for wrapping around shoulders, let alone torsos.


What all this leads me to is somewhere between 1/2-3/4 circular shawl, OR a rounded edged triangle that is dipped in the center (neck) perhaps, with the side wings slanted upward (away from the center back point). The lace used in the sample showed off the color changes nicely with minimal, if any, muddying up, and I think it's because this particular feather/fan variation is quite open, without the garter ridge every 4 rows crowding it. If that lace pattern could be used throughout, with little if any stockinette, it seems it would be a casual piece. If "fill-ins" of stockinette are needed, for instance as they are used in the center bottom (point) and the wing points, so be it. In that event, perhaps a small amount surrounding the neck would be okay also. But stockinette en masse does not seem to be ideal because of the pooling tendency.

NEXT DAY, more interviewing for right pattern, and By Jove, I think I've found it. Miami Vice by threebagsfulled on Rav. My swatch of the all over lace pattern... the colors AND sheen in this yarn really seem to be popping. And the shape? The shape. It works. Yay!

Saturday, April 2, 2011

Second Felted Bag - Yessssss!

I'm really happy with this one. It was knitted to be MUCH smaller (and stiffer!) but this time I babysat the felting process and it just might end up thick enough (stiff enough) to work as a disguised briefcase. If so, then YESSSSSSS!! (Much unbecoming fisting into the air).

What I started with - LOTS of knitting!!!

Finished Dimensions, unfelted:
16"W (not counting side panels)
7"D (duh... the side panels)
16"Tall, from bottom/side seam to top of i-cord bindoff.

Laid Flat:
22.5" Wide (includes half the side panels)
19.5" Tall (includes half the bottom section)

And here's what that looked like, spread out... LOTS of knitting!!


First Interim Felting Check: This is after 5 minutes.
It was still 22.25" Wide and 12.25" Tall, most of the shrinkage at this point having taken place in length. But the stitch definition is definitely blurred. This is "fulled" at this point.


Another 5 minutes (unfortunately photo taking forgotten) yielded 15"W x 9"Tall x 5.75"Deep. So now, in this second 5-minute session, I began losing width, but way more (waaaaay more) in height. On the needles, that would be your length.

Final Felting Session: Here's where I stopped. And this is PRIOR to shaping.
Dimensions:
14.25" Wide
8.5" Tall (Whoa! That's almost 50% and I think more time would have been more lengthwise shrinkage.)
4.25" Deep


RE-SHAPED (via pulling).... to be taller, which is at the expense of width.
Now reduced to 13" Wide
Now INcreased to 9.5" Tall (actual fabric, bends included)
4" Deep

As it sits on the table, it's effectively 9" tall but that's because of bends in the fabric not being counted. That's "table height" for lack of anything better to call its effective height, sitting.


New enough to felting, I'm not yet sure whether re-shaping holds, or whether in the drying things suck back into their out-of-washer dimensions. I hope it holds because I sure didn't get as much shrinkage widthwise as I'd counted on PER the ratio of lengthwise shrinkage.

This whole bag was expected to be 11.2" wide, 3.75" deep, and 7.5" to 9" tall (depending on whether to believe 40% or 50% lengthwise shrinkage). I am REEEEEALLY glad I babysat the felting and am really hoping this will stay stiff enough to serve as its revised purpose.

This photo is where you can sorta see the value of doing an i-cord bindoff which I had never heard of, but was suggested on Ravelry's felting forum by LisKnits. I found the i-cord bindoff to be NOT as easy as the tutorial video youtube had on it, BUT that's entirely because I knit so much tighter than Judy does in her video. This is definitely a finishing technique that's worth knowing about though. Enough so that I'm including a link at the bottom of this blog post for anyone who'd like to have it in their bag of tricks! For fronts of cardigans, for tops of pockets... endless uses. Judy's Tips video shows it up close at the very end of her tutorial. And I must say, her videos have never let me down, she's a really good teacher.


The proof will be in the wearing, but it does look to me as though this might work as a "prospecting briefcase" (which I do not want to have a business look to it. AT ALL.

Planned Strap: Shoulder strap, sewn onto each end. I might make it so it widens where it meets the bag and wraps all the way around, including the whole bottom. Might add outside pockets on each end (over the strap part that covers the body). I don't think I want to add any outside pocket to the front, I like the way it looks plain. VERY un-briefcase-y.

So that's it! As I say, LOTS of knitting, but this is mindless knitting in the round - good TV knitting. I'm super happy with the result AND with this yarn for a felted bag, thanks to Vicki in Indiana for having found it!

Here's the i-cord bindoff tutorial video. Is this nifty or what!!

LINK NOTE:
Well, I can't seem to link the i cord bindoff video! Go to youtube dot com, and in search box, type in " Knitting Tips by Judy: I cord Bind off "