Tuesday, September 18, 2012

Jogless Color Changes

After a year and a half of lace knitting, I got a yen to knit a pair of legwarmers for my precious, adorable, loveable, never-sits-still, determined, speed-crawling 1-year-old granddaughter.  Momma Jenny said she really likes stripes.  And bright colors.  My LYS recommended Plymouth Merino DK which throws in "Superwash" on the label, to boot.  This is a corded type, many-ply yarn with very high twist and it has no halo.  (That also spells frighteningly high stitch definition where any irregularity GLARES at you.)  All they had for "bright" was orange, but since Jenny likes orange and they had one lone skein left in a green that was asking to be paired with it, that was that.  Her colors. 

Okay, so in my 5 years of knitting, I've never done stripes that are narrow enough to keep two yarns active, carrying them forward.  Let alone doing that on a tube, knitted in the round. 

So at my first color change, I tried a simple k2tog which I'd been shown at the LYS but didn't like it.  Next, I tried TechKnitter's "jogless" method where you simply start knitting with the new color, but on the next round you slip that first color-changed stitch purlwise (without moving yarn to back I found out).  I still saw a visible jog.  Now, TK says it's minimally noticeable if seen on the fly, and her samples appeared to have been blocked which can make a huge difference, but I'm obsessive about stuff like this, in the raw.  So I then went to youtube and watched "jogless knitting stripes in the round" by knitpurlhunter, where she also just starts knitting with the new color but on her next round instead of slipping the stitch as TechKnitter does, she lifts the right leg of the stitch below, up onto her left needle and knits it together with that stitch.  I didn't like that one at all.  I did watch Eunie Jang's video on the subject.  Well, as always, I was so depressed watching how freaking fast she knits that I don't even remember how she did her color change other than that, again, I saw a jog.

So I went back to the TK's method.  Okay, so it does have a jog but admittedly it's not a bad jog.  And I do see that if stretched much at all, it shows very little. 

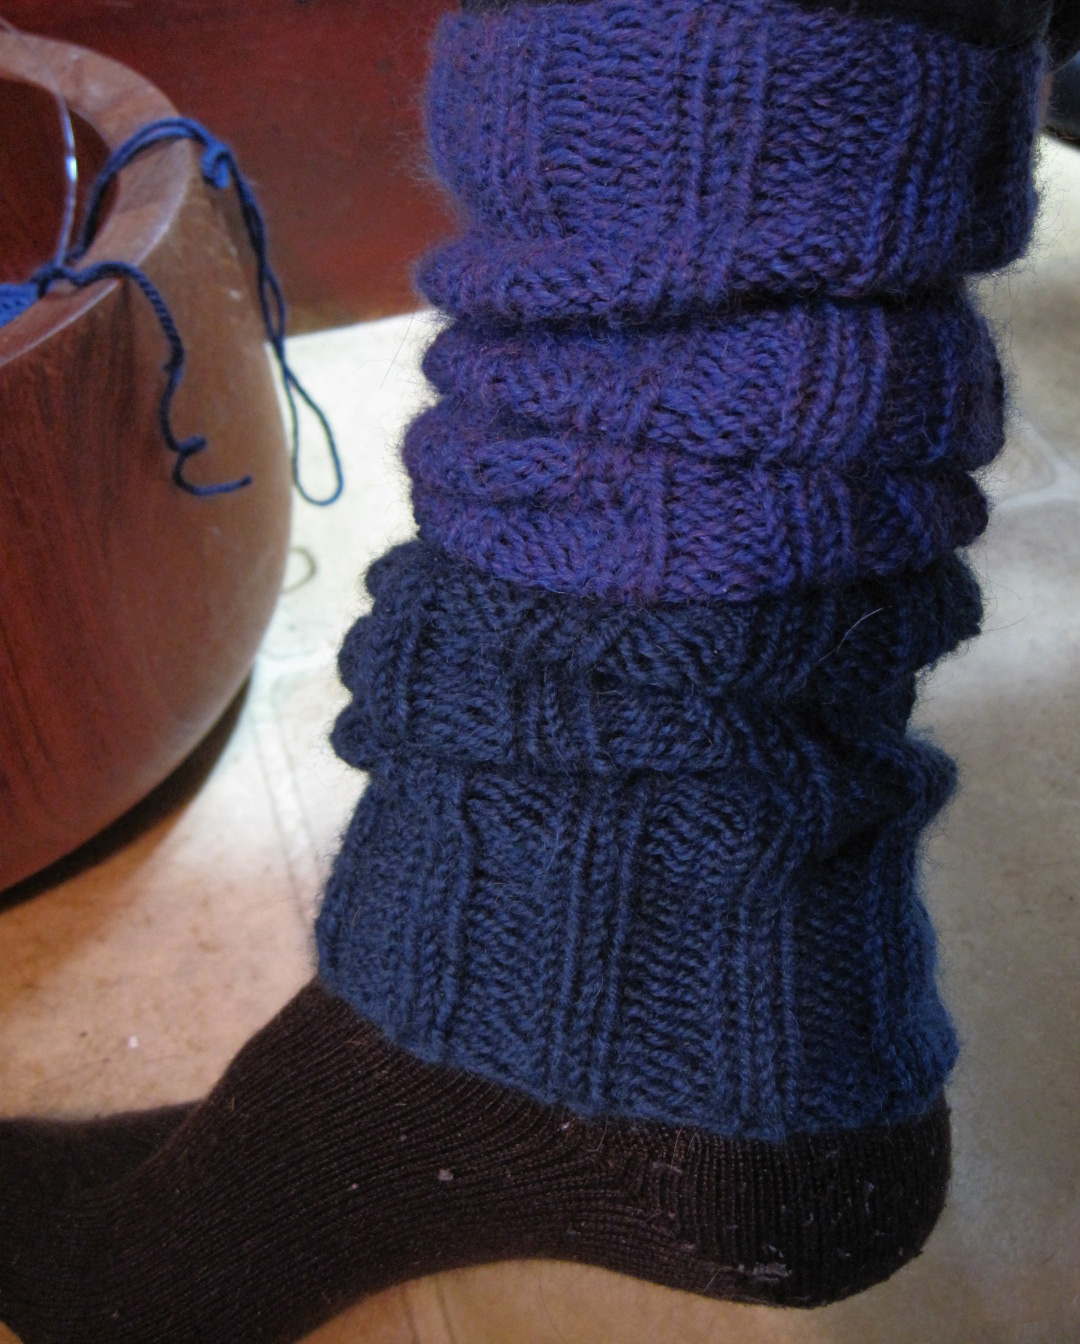
Ignore the top green-to-orange change just having been made on the needles, which I'll talk about in a minute.  The rest of the color changes are just as TechKnitter prescribes.   

Well, looking at it closely, it's that right leg that's the culprit.  That's the long-ish one from the slipped stitch.  The left leg lends itself to "unobtrusive slant" if it just didn't have that damned right leg sticking down longer. Still, it was the best I'd tried out of the lot, so I accepted it. 

After a couple of times though, just for the heck of it, I tried something of my own to modify it.  And Wow!!  NO jog!  There is still the slant, yes.  But knitting in the round is a continuous spiral, so you're going to get slant anyway.  But this had very minimal added slant. 

Here's the first color change with my little added trick, shown at the top of the green-to-orange color change just after knitting a few rows beyond the above photo.
   
So here's what I added to TK's method (my changes shown in red). 

Round 1 of a color change:  Knit 3 sts in old color just as you've been doing.  Then simply start knitting with new color starting on the next (4th) stitch.  Knit around with new color up TO that 4th stitch of the next round (your first new color stitch).

Round 2:  And having knitting the first 3 sts and now ready to slip the 4th (color changing) stitch, bring OLD color's yarn to front of work.  Slip stitch #4 purlwise (wyib).  Return OLD color's yarn to back of work again and drop it, and just continue knitting with new color.  (You'll have now wrapped the slipped 4th stitch with the old color.)

Round 3:    Knit 2 of the first 3 again, and knit the 3rd stitch somewhat tightly.  Knit 4th stitch (the one you've slipped and wrapped) as normal.  On 5th stitch, pull old color's wrap taut from the back so that its tension looks consistent with all else on the front of the work, and trap old color's yarn however you normally trap a floating carry-forward (OR see below note re trapping a yarn being carried forward vertically).  And just keep knitting with the new color.  At some point, give a glance to the wrap to make sure its tension remains right, and maybe trap the old (carried forward) yarn once again in another couple of rounds just to secure it more.

So what have we done here?  Not much!  TechKnitter's little jog is still there.  All I did was wrap the slipped stitch with the old color.

Here's a close up, face-on shot where it shows with the wrap pulled aside.


These next 2 photos are shot at the same angle, one with the wrap pulled loose, 
the next with it pulled closed.


So we've used TK's otherwise very excellent color changing method, however we've added an old color's wrap around TK's 2nd round's slipped stitch which simply covers up the bottom of that right leg that creates the jog.

Now what's fun about all this is that normally a wrap sits horizontally across the top of a stitch, just like a purl stitch's collar.  But because slipped stitches pull things off skew, fortunately the wrap itself gets pulled into a slant too, just enough to be really useful. 

So that's how I'm going to do my color changes from now on.  Using TechKnitter's very good method, but adding a simple wrap around her 2nd round's slipped stitch and securing its tension on the 3rd round.

Meanwhile, just a side note.  Many people do their color changes at the beginning of a round because that's where they do them at the beginning of a row when knitting flat. Well, when I first started knitting in the round, I'd already seen laddering from both magic loop and DPN needle changes and vowed I'd never get them.  I learned that when you change needles on either Magic Loop or DPNs, you do want to pull that first stitch tight, sure.  But it's the SECOND stitch that needs to be pulled tight also.  So that's sure not the place to be doing color changes!  So I just picked the 4th stitch of a color changing round arbitrarily because by then I'm done with pulling the first 2 sts tight after a needle change, and I do like to snug even the 3rd one a bit. 

One last thing about color changes followed by a slipped stitch done on the next round.  Techknitter points out that if you do the color change repeatedly on the same column (e.g., in my case on the 4th stitch), especially on narrow stripes, you'll very likely start to see some pulling up, because you have repeated cases of slipped (not knitted) stitches in the same column.  She suggests moving your first stitch of the color change over to the next stitch each time.  So my first color change took place on the 4th stitch of the round as outlined above.  The next color change after that, I did on the 5th stitch.  And so on.  The last color change on this particular legwarmer took place on the 11th stitch of that color changing round. 

Trapping a Carry-Forward yarn while knitting with the alternate color:  Okay, since carrying another color yarn vertically was all new to me, I was really watching everything closely because I wanted this first legwarmer to be the only place I see any messes.  It's my learning piece.  Well, I found that when I wanted to anchor (trap) my old color's yarn every few rounds to avoid long snag-worthy floats, I've only known to twist the old yarn once around the new yarn every now and then to trap it, and keep knitting.  One time it worked fine, it all stayed behind the scenes.  But another time, the old yarn peeked through so that there, right in the middle of my subsequent nice clean knitting, there was this unwanted peek-through of the unused color.  Awk??  I had no idea what I'd done differently.  Well, oddly enough, on the good traps where it did not show through, I'd twisted the yarns counterclockwise.  The one where it showed through, I'd twisted them just the same, except I'd done it clockwise.  Now don't ask me why this would make any difference, but the ugliness happened twice and both times I'd twisted the yarns clockwise.  So while I'll just plan on making my trapping twists counterclockwise from now on, if you have any idea why there's a difference, please leave a comment because I'd love to know.

Techknitter's article on color changes:  http://techknitting.blogspot.com/2007/01/jogless-stripes.html
...and in getting the link to include here, I just happened to scroll down farther on her page only to see that she has a sample with the exact same green/orange color combination that I'd used for these legwarmers!  So hey, not being an orange or green fan, at least I know I picked 2 colors that have some universal appeal.  :-)

Monday, June 25, 2012

Horse Heaven

When you have a horse for seven years and you've taken care of her, from her most intimate needs to scratching fly bites on her chest as she cranes her neck to guide your scratching spots...

When you've gotten out of bed at 2am to trudge out to the barn with a flashlight to see if the sub-zero temps and high winds that knocked out your power have her shivering...

When the barn roof got to the point of its last legs so that metal panels are banging loudly in a vicious pounding rain storm and you know she's run out into the middle of the field to brave it worse there rather than be in a scary loud barn where she could eat her food, and she's gotta be hungry as well as cold and scared, so you've set a clock every hour to suit up in rain gear and run dry hay out to her in the dark...

When you've hugged that horse because you're down, and you've stuck your nose right into her shoulder so you could flood your senses with the incredibly right smell of a horse...

When you've been rudely dumped out of the saddle during a spook, and that horse has run off by instinct, but stops and turns around, ears cocked forward, her expressive eyes showing worry and concern as she looks for you to stand up out of the the tall grass...

But then also when that horse gets scared and is just on the verge of turning to flight when the sound of your voice saying "it's o-kaaaaay, it's o-kaaaay" makes her stand still and her ears relax...

When you take that horse across country and for 3 days each way, and your porta potty in the trailer is within reach of her plopping a glop of gooey half masticated hay on the top of your head as you squat and pee... and then she does it...

And also when you throw down a tarp in a stall neighboring hers at a horse motel en route because it's too late to pitch a tent, and you fall asleep to the sound of each other's breathing...

And finally, when you take that horse into the trails alone and it's just the two of you, and you suddenly feel things change so that you know your imperceivable impressions are being read loud and clear, and you become aware that there is some unexplainable line of silent communication that's come about between you and her...

You get to where you really, really love that horse.

I got this horse, my first, at my age 63, her age 18 and that makes us peers.  We had many great times together, and I know she did too because horses have ways of telling you that.  When I decided that prudence and common sense dictated it was time for me to hang up my reins, that left her standing around with nothing to do, and as a lone horse, that's not a good thing.  For that reason, I tried to re-home my equine buddy twice in the last 6 months.  No fault of hers that it didn't work out, I repo'd her the first time because I had underrated red flags (or else they just weren't there then as they became so in retrospect).  The people looked good.  They weren't.  Stupid decisions, lots of lies and overuse of her without conditioning almost lamed out one very good horse, and though I had to walk her out of there in pouring down rain and winds for 3 blocks to get her into temporary housing, then pay dearly to have her trailered back home, I went over there and took her back.  The second rehoming I did on a trial basis and nothing wrong with new owner OR the place, but this horse is a long way from retirement and she was too hot for the level of student she was looking to accommodate.  From my buddy's standpoint, it was just too busy of a lesson barn.  A good lesson barn where horses don't get overused and get very well cared for, but it just wasn't right for someone who's been on her own, in a free run-in.  She wasn't happy there, and you could see it in her eyes.  I didn't think she'd ever have been happy there.  Back home again. 

I believe I've finally found the perfect place for her.  There are 3 other horses in residence, a Fjord gelding, a Hafflinger mare and a little spit of a thing, a Mini.  They are all sane, sound and friendly.  There's a calm and contented energy among them.  My buddy has not lived with other horses and I wasn't sure she'd do well at fitting into a herd after so long as a solo, but under the circumstances which follow in more detail, the herd instinct can become more valuable to a horse than what they're used to, just because they are.  It's how they live in the wild.   

This is a very nice couple here in town.  They have four children, one of whom is taking riding lessons.  Mom rides, too.  Dad, once in a while, and he's a secure male, not one who likes to show how big he is by needlessly jerking around a 1200 pound animal.  They have 100 acres.  Mom's a feminine little spit of a thing but she does all the fencing herself, from digging post holes to stringing it, and the entire place has perimeter fencing.  In the morning, the horses are given their grain.  They are then led out "to pasture."  And this is the most natural environment I've ever seen anywhere near here.  They are simply turned loose into hay fields where one field leads into another, into another.  Plenty of nooks and crannies with shade trees are spotted around here and there throughout these meadows.  The horses all stay together, but they migrate as a herd from one grazing area to another, freely, at will.  Just like they do in the wild.  They will lie down and nap, and roll.  They are secure.  They can even go into the woods part way to the outer fencing.  It is completely ideal.
One or more of them gets ridden a couple of times a week, usually for an hour or so.  Other than that, they get to be horses.  At night, Mom and Dad or one of the kids go out into the hayfields and find them.  They come when called or are even waiting by the gate because they know the routine, and she leads them back into the barn/paddock area near the house, where they get grained and retired for the night.  And the next morning, repeat.  It's predictable, it's safe, and it's natural.  Since she rides on property only, and ice isn't an issue there like it is in the paddock here, she keeps them barefoot, unshod, the very best scenario.

My buddy has only been there for a few days, but I've been in touch with "mom" at least once a day and she reports that all signs are good.  She's blending in, and from all appearances (and there are equine-specific signs), she's showing every indication of being one very happy horse.

I will know for sure that all's well and permanent when I feel it is.  It probably already is, but I just need time to be sure myself.  They're right here in town, I can go by and see her, and the new owner said that if I want to come over and go riding with her, she'd love to.  I see nothing that appears unworkable about this.  All "vibes" are good, and the signs I'm looking for appear to be happening.  The squeeling when another horse got too close upon first introduction was very short lived.  It only happened two or three times when they were first integrated, and within a couple of hours, she tolerated the gelding co-grazing on her (then separate) hay pile.  Out in the pasture, the first night after a full day out there, she followed the other horses when they came in for the night.  She hasn't shown neck over neck bonding yet, but this is too soon for that and it might happen out in the fields before it gets seen, or not.  But there's no fighting and no signs of it.  While I haven't been there to get impressions of her in pasture residence yet, from the sound of it she's putting out a very peaceful, content appearing energy.  I will rest finally sure when I know that she's willing to lie down (a vulnerable proposition for a horse, and one of the last signs to show that she feels secure).  But I strongly suspect that once she's had a chance to see the other personalities in action over a period of time, she'll trust them to stand sentry, and they'll trust her when it's her turn. 

If this continues to be as it sounds like it's headed to being, then I can say if I were to design the absolute perfect rehoming for this animal, I wouldn't have even ventured to ponder anything this perfect.

UPDATE:  It's been over 3 weeks.  She's fit in.  I went over to visit her after 10 days and just in that time, her muscle tone went from good to solid.  She's getting exercise just naturally during the day with the other horses, and she shows every sign of being thrilled to get tacked up and ridden--one of the many better-than-the-last of surprises she gives her human companions as they get to know her.  (Not too many horses like her.)

So, beautiful, sensitive On Cloud Nine, finally and long coming for it to be just right, it's still very weird not to hear you nicker and trot in when you see me and I think it always will be, but this is the best gift I could have given you. 

Run with your mane in the wind, old friend...

My Most Challenging To Date...ARG!!

A childhood friend of my daughter (her first when we moved here) is getting married in late July and it will be an outside wedding in a park.  Not dressy, but not jeans ilk, either.  Chances are greater than not that it'll be hot.  I'm trying to avoid buying an outfit I can't get wear out of, so figured that a simple, plain solid, summerweight "nice-fabric" pair of slacks or skirt and hopefully same color top would work well if I made a very nice lace shawl that could honor the occasion.  That means lace, so it's not hot.  And it means something other than wool yarn, because even an open lace pattern in wool laceweight provides warmth. 

My LYS has their own brand of yarns and they have an outstanding dye guy, who uses good quality yarns.  I went in there asking for "something fine, something very cool."  We landed upon his line of very beautiful 100% silk laceweight.  (1085 yards to 100g).  All his colorways were gorgeous in this silk line, but what kept calling my eye back to it was a dusty light green without yellow tones or "minty."  This color doesn't show up on most photographs, but I was able to get it pretty accurately on this one, so in viewing the photos that follow, this is the yarn, complete with sheen and all.


About that yarn, this by far THE most challenging thing I've knitted to date.  Not because of the pattern, but because the yarn is very slick, it's extremely thin (like working with 2 strands of sewing thread) and my needles are also slick enough so that when laying the point tip of one against the shaft or taper of the other to dig out an ssk, it's like mercury against crisco.  Not only that, when you slide the sts from your circular cable onto the shaft of the needle, those sts have pulled taut onto the much thinner cable (being slippery, nothing prevents it) so they are a struggle to push onto the needle.  And then, of course, they readily overlap, one over the other.  Sometimes one over several others.  MUCH time is spent carefully, painstakingly e-x-t-r-i-c-a-t-i-n-g all that overlapping of stitches with the thinnest edge of a fingernail.  These rows took me a minimum of 35-45 minutes each.  The one row that involves a complicated Estonian Lace stitch (5-st twist a/k/a star stitch) took me 3-1/2 hours.

But here it is, finished and finally blocking.  Wet-blocked onto 7 ft. of blocking mat squares lined up with one offset mat at each end for the curve.  I did NOT block it aggressively.  Center back, bottom to top, about 20" at the points and about 18" at the rises (the white blocking mats are puzzle-notched, the unmatted portions are my office desk).  This took me two days short of 7 weeks.


Full depth.  Laying flat as it was, I measured 20" depth at the points and 18" at the rises, neck edge to bottom.  (Photo looks weird because of the puzzle piece edges of the blocking mats, it's the neck edge that's off the mats and I used sewing pattern weights to trap it in position.


Close up of the beaded sections...


Beads take a LONG time.  To mount one, you use a ridiculously thin crochet hook that looks more like a hypodermic needle and has the teensiest hook on the end that I can't see it without a magnifying glass.  You slide a bead onto the hook shaft, then take the stitch off the knitting needle.  Slide the bead down over the whole loop.  Return the stitch back onto the knitting needle.  And knit it.  You do that for every bead, one by one, stitch by stitch.  (If you accept that this is just going to be very time consuming it gets easier.)  The pattern does not call for the beads on the lower mesh section, only on the u-shaped scallops above that.  Another knitter beaded the mesh sections and I loved it, so followed her design.  Nicely, she provided a diagram for others who wanted to do theirs that way also.  I did learn a shortcut to beading over ssks and k2togs as these are, which made it easier. 

This is a closeup of the Estonian Lace stitch.  Fortunately it only occurred in one row.  (Two per repeat, 13 repeats, there were 26 of these.)


Though I'm not done experimenting with how to wear this bigger-than-expected shawl, this is what Jenny and I came up with so far.  Though I took it to my LYS who did the yarn, and it seems to have contracted some because at least in their mirror, just laying it over my back so the designer's talents show, and letting it cascade down the front, worked.  I might re-block it pulling more depth to shorten wingspan because I really treasure Susanna IC's designs which deserve to be shown in detail.  (To say nothing of showing off the result of HOURS of at times very frustrating work.)

But until then, at least this shows it some, on a human body.


Unfortunately the top back neck edge was rolled up here, and that's actually one of the prettiest parts of this design, which is why I want to get the wingspan blocked shorter so that I can wear it in a way that shows that beautiful bit of design work.

So there it is.  My biggest knitting accomplishment up to now.  I don't know if I'd ever tackle anything this large with that slippery of a yarn/needle combination again, but I learned a LOT in the doing and will unmodestly say that I am very proud of having completed it.

Friday, February 24, 2012

Home Pressure Canning

   Wow, I haven't done any canning for several years, and about a week and a half ago, I got the bug.  It's been on my mind since the last 3-day power outage when I was thinking how wonderful it would be if I could crack open a quart and a pint of homemade spaghetti sauce with lean ground beef, sweet Italian sausage and chunky veggies and sort of just live on phenomenally delicious spaghetti, all for the time and hassle investment of making a box of pasta. 
   Whether during a power outage or just in the course of living, there's just nothing like a bunch of mason jars in your pantry, filled with recipes of homemade goodness that normally takes 2-3 hours to make each.  Split Pea Soup for example, Beef Stew for another, your own family recipe of spaghetti sauce with good quality lean ground beef and sweet Italian sausage.  Chunky veggie stew and even "real" gravy for open face sandwiches using cold cuts on bakery fresh bread. 
   The only kind of canning I knew how to do originally was Hot Water Bath canning, where you are very limited in what you can safely can—mostly fruits and fruit based jams and jellies.  Those are high acid foods and they're wonderful if canned in season because unlike commercially canned peaches, you can do them when they're at perfection of ripeness.  And spice them up with cloves and a stick of cinnamon in the jar. 
   Alas, however, canning peaches, for instance... while there's nothing like them otherwise, it means lots of pots, lots of time, lots of space, timing and a huge amount of clean up.  With Water Bath Canning, you need to sterilize the jars, boil the lids, have one pot of syrup, another for blanching the skins loose, your sinks somehow available for peeling off the skins, another pot for treating the fruit so it doesn't darken... everything gets sticky and messy.  In fact the times I've done it, the floor also has to be well-mopped because that sticky syrup drips around as you're rushing to get sterilized jars filled and closed.
   About 10 years ago, actually more, a friend introduced me to pressure cooking, and from there I went into pressure canning.  Now that had always sounded very scary to me.  Low acid foods are where people get into trouble with little things like botulism.  However some research (and I did a LOT) made me realize that if you learn how to do it and observe all the safety rules, it is SUCH a no brainer!  I mean, ridiculously simple.  You don't even have to sterilize the jars, it's all done in the high heat processing.  So Pfffft.  Easy Peasy.
   From there and more research, I started seeing that you can, and often should, undercook everything before canning it which avoids ending up with the mush you get from grocery store shelves.  Is that safe?  Yup.  Because it's cooking inside the jars as you process.  75 minutes under the high heat that takes place under 10 pounds of pressure... if you don't undercook it at least a little, you'll end up with mush.
  Yesterday I made Split Pea Soup again because I canned a half recipe of i a week ago and it's almost all gone.  Prior to that, I made spaghetti sauce.  This weekend I'm planning beef stew.  And probably some canned carrots with dill, just to have on hand.
   I forgot how simple it is, how little cleanup it generates, and how unbelievably great it is to get to enjoy a recipe (that takes several hours to make) months later with nothing more elaborate than 2 minutes of reheating in a nuker.

Split Pea Soup with sliced carrots, potato and ham...  Total "active" time?  Maybe an hour accumulated.

These carrots do not disintegrate in your mouth, nor are they anything like the flavorless pap you get commercially.  They went into the pot of "al dente" undercooked pea soup only long enough to heat through, as did the potatoes and ham.   

   A quart jar of homemade spaghetti sauce.  I use a LOT of meat, both ground beef (90% lean and excellent quality) and sweet Italian sausage, plus this "straight-from-Italy" authentic family recipe uses pretty good sized chunks of bell pepper, carrots and other things.  Try finding that on your supermarket shelves, it just doesn't exist.  Jar is lying on its side to see through better...

 There are certain things where newer isn't necessarily better, and it's been my experience that cookware is an arena where that's true.  I use a vintage Mirro-Matic 12-qt. pressure canner.  It does 8-10 pint jars (depends whether regular mouth or wide mouth style) or 7 qts. of either jar type per load. 

Pardon the splash of pea soup on the side, it was a casualty of a ladle that slipped as I was loading jars and didn't notice it when I took the photo.

A close-up of the pressure gauge which was mounted here to operate the canner at the 10 lbs. pressure used for canning...

   This vintage canner is like a tank.  I haven't seen today's "new and improved" ones that are made in China, I only know that they are significantly thinner material, and for something like pressure canning, I personally prefer heavy cast aluminum.  It works every bit as well today as it did when it was sold off the shelf, and I have no idea when that was, probably 60s or 70s, I doubt later than that. 

   One thing to know if you buy a vintage pressure canner.  Most sold on eBay come with a manual but if it doesn't, you can often find one sold separately on eBay.  You might also be able to get one from the manufacturer (I'm for sticking with Presto or Mirro for vintage pressure cookers/canners).  If not, you might be able to get  someone to photocopy the chart and use pages and snail mail them to you, or scan and attach to an email.  Use that manual as your guide for operating the canner itself, including steam exhaust directions, how much water to use, etc.  Do not settle for what it contains regarding how long to process the various low acid foods.  Many of those numbers have changed over the years and you want updated information for canning safety, meaning info not the pot itself, but the length of processing time, here's what I've found to be our best bet. 
   The absolute best, and undisputed authority on all things having to do with canning is Ball who produces the jars and lids we use, and has for a zillion years.  Ball puts out an inexpensive but wonderful book that they update from time to time, called The Ball Blue Book of Canning and Preserving (called simply "the blue book").  They sell for under $10.  Get one.  Study it.  Follow its time charts.  It covers hot water bath canning (fruits), pressure canning (low acid foods), freezing, dehydrating and has tons of tips plus recipes.  If using your own family recipes, there will be a similar one, most likely, in the Blue Book.  Make sure you aren't using any ingredients that aren't in their recipe, and if you are, no problem; in that case, just verify that its processing time doesn't require longer than called for in the recipe.  In other words, your total processing time is always that of the longest called for by any of the ingredients.  If everything else calls for 45 minutes and your one added ingredient requires 90 minutes, you might want to choose to omit that ingredient because it's forcing all your others to go disproportionately longer. 
  As for testing the seals, again follow Ball.  Let everything cool completely because lids often pop down during that time (you can hear them pinging, one by one).  Do not be alarmed if when you remove your jars from the canner you are still seeing boiling or simmering action inside the jars, even for 30+ minutes after they're out of the canner.  This is HOT stuff.  But observe the tests set forth in the Blue Book for knowing if you have good seals or not. 
   Third, don't panic if you see food around the neck of the jar and on the inside of the lid.  During the exhaust of air inside the jars, food can be carried.  It doesn't hurt anything unless it interferes with the seal, and you'll know that with the lift test (which you'd of course do with your other hand ready to catch the jar should the lid come off). 
   Once fully researched so you get the shtick of pressure canning understood, you have all sorts of fun ahead of you.  To say NOTHING of saving a fortune between your own far superior home canned soups and stews vs. that pap we find on grocery store shelves.  (By comparison.)  It's all relative.

Thursday, January 12, 2012

Doo Does Lace. And Beads??

Okay, now that I'm becoming (cough, choke) "mature," I've been trying to figure out what kind of old lady I want to practice being.  It's entirely flexible because it's all a mindset.  I have zero interest in enriching a plastic surgeon and not being able to frown because when you inject botulism into your face, your face doesn't move anymore.  And that's pretty creepy but also, when I frown, I damn well want people to know it.  So that's out.  I sort of decided on accepting the inevitable aging things, but doing it gracefully.  That was the ideal.  However the reality concern about that mindset is that it's too easy to ignore style entirely.

I've pretty much decided to accept "conservative New England" because that's kind of where my head is.  It means LL Bean and I live in LL Bean clothes.  My whole wardrobe is LL Bean.  Like to an after-the-fact realization.  If I look at my wardrobe, "Regular" in winter is their Turtlenecks, mock turtlenecks and "dressy" is their Pima Cotton long sleeve tops.  "Regular" in summer is their Saturday T-shirt and "dressy" is their Pima Cotton short sleeve tops.  I can't knock those Pima Cotton tops, they're a thin drapy fabric, cool to wear and though they are pretty perishable, they go anywhere.

So with that mindset I did something strange.  I have no idea where this came from, but for some reason I got a yen to knit a "real lace" shawlette.  And with beads!  Now finer lace (meaning laceweight yarn) is a departure for me to some extent, but beads are a total departure.  It made me wonder if those neurons are starting to misfire.  I mean, one could take that as a sign, even though it would be a pretty benign sign.  But anyway, I went into my LYS and looked at laceweight yarns.  Now Jerry (husband) has some very set opinions that I don't always agree with (e.g., Ravelry won't be around much longer because Facebook is losing steam).  But he's a really good dyer.  Pretty phenomenal in fact.  He had a colorway that I can only describe as the color you stare at when deep sea fishing off the coast of southern California.  (Damn, I miss deep sea fishing.)  It's a color hard to describe, but that's the color of this colorway.  It's not deep green, it's not deep blue, it's somewhere in there.  It's not flashy, it's very muted.  But not dull.  And he pulls off an ever so slight verigation.  It's easy to get big ones at the dye pot, not so with "ever so slight."

I bought that yarn.  To give you an idea of how fine it is (maddeningly so on a size 7 needles that are VERY slick, to boot), there are 1,000 yards to 4 oz.  That's pretty fine.  Not "cobweb" but definitely at the finer end of the laceweight range.  Let's just say I have no interest in knitting with anything finer. 

The beads?  Well, Cindi is pretty blingy, she favored some really blingy ones.  I went for the same color beads as the yarn EXCEPT they have sparkle.  Not cheap brassy sparkle.  Okay, it's the kind of thing where on an ever so slightly cloudy night where you can still see the stars, they don't scream out at you, but you're definitely aware of them.  That kind of beads.

So I was going to make a shawlette I've made twice before because it's easy.  But instead, just for the fun of it, did a pattern search on Rav.  Bunches of thumbnails.  But one stopped my eye in its tracks.  Both eyes.  Not a lot of beads.  Again, like stars are on an ever so slightly cloudy night.  And the feature photo's yarn color was a dead ringer for mine.  And that's how I met Susanna IC, designer par excellence.  The name of this shawlette is "Little Leaves."  It was a definite step up from any lace I've knitted before in terms of complexity, but not so far out there that I felt defeated. 

People called this a "quick knit."  HAH!  Not for me it wasn't.  But I finally got it done and it came off the blocking mats yesterday afternoon (probably 12 hours too soon but oh well.)  It is GORGEOUS in person.  The shape is quite unique in the way it's constructed, but also because short rowing is used.  It fits if worn as a shawl because it meets in the middle and doesn't spread apart at the bottom edge.  It can be tied and it stays tied (the square cut ends).  Its wing tips can be flipped over the shoulder and they stay put.  AND they cascade into a point (out edge's front corners).  It's perfect.  I love this designer.

These photos do not show the color of the yarn but that's hard to get anyway.  So with that preface, here it is.

Blocked (the shape as you see it, but could have blocked it more spread out if I had more mats)...


Best shot to see the leaves stitch pattern....


Best shot to see the beads which are hard as hell to photograph and get their color.  I could only get it by shooting at a slant, totally warping the yarn color and to some extent the beads color but this shows their placement, hence "not overdone."


So now sure, this can be worn with LL Bean and with jeans too, because people do all that now.  But with a red down jacket that makes you look like a marshmallow??  I don't think so.  I might have to add a slight variation to "New England LL Bean Conservative" and buy some sleeker pants.  And shoes that aren't slip-in clogs....  with hay and dried horse poop on them.   

Thursday, December 8, 2011

Two For Ones Purely Practical Legwarmers


When we think of legwarmers, we often think of scrunched up fashion accessories worn around the ankles over tights.  While you can certainly do that with these, they were conceived to wear under jeans or business pants for warmth and to stay up so you don't have to fuss and fiddle with them throughout the day. 

Having made one pair last winter and finding I was living in them, I wanted more colors because they can be seen when you sit down and cross your legs (hence socks coming in different colors).  But I didn't want to make that many pairs.  Therefore, these are 2-toned so I could wear them with either color at the bottom.  I don't wear mine on the outside so I didn't care how I paired my colors, but if you do, just pair compatible colors because they look good out too.

These are meant to fit a bit snug, consequently they also serve as what older folks will recall as "support hose."  They just feel reeeeeally good. 

While you wouldn't think that two tubes would require much thought, this pattern is more a discussion of ribbing behavior and fit than just the "how to" knitting directions so that whatever size you are, yours can fit and stay up as well as mine do. 

Mais Voila.  Mindless TV knitting.


Sort of like knee socks except without the feet so they don't have to be washed every wearing.
Worn so bottoms will show over shoes (above photo)

OR worn higher up so they won't show at all.

Or scrunched over tights if compatible colors are used.


SIZE:  Since gauge is impossibly inaccurate on ribbing, the pattern as written comes out perfectly for the following measurements... use this as a stitch/measurement ratio if you need to adjust number of stitches up or down for your size (further discussed below):
Measured with foot flat on floor and sitting down, this is for calf size 12 inches around at widest point, and 13" long from crook of knee to bottom of ankle bone.  There's upsize width leeway built in if using needle sizes 6 and 7, but if your calf is significantly larger, you might want to add stitches (pattern is 4-stitch repeat).  If your calf is less than 12" you would subtract in 4-st increments or go down on needle sizes, or both.   

WHY TWO NEEDLE SIZES:  I found that a little ease at the bottom keeps these from rolling up if you want to wear them at clog-top length.  (It does not lay loosely or add bulk if you don't want them showing at all.)  At the same time, that same amount of ease at the top keeps them from being binding at the crook of your knee and rolling down.  So at both ends, the same ease works well, but for different reasons.  Also, just FYI it is not the tightness at the top that holds these in place, but the snuginess around your calf, which beats a 1-point stranglehold any day. 

   In the instructions, I'm using needle sizes 6 and 7 but I knit on the tight side.  By dropping down a size (needle sizes 5 and 6) that also works if I want a little snugger fit for added support. If you knit at all loose, definitely use the smaller set of needles.

EASY PEASY PATTERN for the stated leg measurements (or to be adjusted for you, as described above):
      Cast on 40 sts somewhat loosely onto the larger DPN needles (or 40" circulars if using Magic Loop) and join in the round, knitting 2x2 ribbing (k2, p2) for 20-25 rounds. Switch to smaller size needles and continue in 2x2 ribbing until half the total length that you’ll want from crook of knee to top of where a clog shoe top would be (*DO see important note below re determining that length*.  For the above leg measurements, that halfway point would be a total of 9 inches of knitted length for a 13" long span).
     Switch to second color and continue 2x2 ribbing on same needles with new color for the same #rows (mirrored).  And, of course, approx. 20-25 rows before anticipated finish, switch back to larger needles and knit until you have a mirrored duplicate of the entire first half.  (If you misjudged and discover you want to make them longer, no problem.  It makes no difference if there's more length in one color than the other.)
      BIND OFF: Absolutely, truly, take-it-from-experience, consider using Jeny’s Surprisingly Stretchy Bindoff, an excellent video, and do it with medium-to-slightly-loose tension.  I have used Zimmerman’s Sewn Bindoff and this is so much easier and faster.

This bindoff (for socks, mitts, etc.) looks like this.  As you can see, it respects the ins and outs of ribbing very well.

**VERY IMPORTANT NOTE RE LENGTH:**   If you want these to stay up without fussing with them throughout the day, do heed this.  When these stretch widthwise over your leg... and they are meant to stretch quite a fair bit, they WILL shorten lengthwise, and significantly so (like over 30%!).  So do try them on as you go to see how many of your rows settles in to x number inches.  Wear them for a while, because you'll have pulled them taut when putting them on.  The trick is to know how they measure after they settle in to whatever length that many rows wants to be.  If erring in any direction, err on the side of long.

YARN:  Use any worsted wool you want, but I am totally sold on Berroco Ultra Alpaca for these.  (No association or connection with the company).  My reasons -- it has such great bounce-back when knitted up. I also find this yarn to be warm but not hot when inside.  I'm somewhat wool sensitive, and it's not one bit itchy.  (I thought it might when I felt it in the skein but it knits of soft and non-itchy, plus very soft and squishy.  Ultra Alpaca is also a joy to work with, not at all splitty.  It comes in 38 colors and Berroco uses very good quality fibers.  Finally, dollarwise it's a great value in terms of quality and amount for the price.  So those are all my reasons for such a plug on using this particular yarn for these. As a bonus, though, with 215 yards per skein and only approx. 120 yds. per color needed for the legwarmers, that leaves me enough yarn left over for a pair of Maine Morning Mitts (free pattern on Ravelry) in each color.  I got mine at Yarn and Fiber Company in Derry, NH which has a ton of colors in stock, reasonable pricing and as far as I know, they often don't even charge shipping. (Do still check if you call them or order from their website).  And I have to mention it -- though Cascade Lana d'Oro worsted has the same 50/50 alpaca/wool content and appears interchangeable, having knitted a pair of mitts out of it, it's no substitute IMHO for a ribbed project that needs bounce back.  It's a looser ply, somewhat splitty to work with and it just does not knit up with anywhere near the same heft or memory.   

One final note:  If you make these and do a project page on Ravelry, please link them to my Ravelry main pattern page.  I love these just as is, but would be thrilled to see any modifications that others might decide to make too.  

Sunday, November 20, 2011

Two Quickie Yum-Yums

Blueberry Tart-like Thingie
When we had the power outage I lost all the meats and any other iffy things.  I had several packages of frozen berries, one of which had been in there long enough to dump, but after that hit the bin I reconsidered two bags of blueberries.  I mean, the worst that would happen is they'd be refrozen into a block of ice which wouldn't help the taste any, but it was worth seeing about.  It turned out they were fine, but I had to defrost a bag (and a whole bag) to find that out.  So now what do you do with 2.5+ cups Maine Wild Blueberries?


I've always snubbed my nose at readymade pie shells, but didn't want to invest the time to make a crust on an experiment, so picked up a package of two refrigerated Pillsbury pie crusts (usually parked somewhere near the refrigerator rolls).  Then I found out thata for a real blueberry pie, you need 6C fruit.  So modifying downward from a random recipe I found on the web, I threw together a proportionate amount of ingredients, and THIS TURNED OUT GREAT!

Since there isn't enough fruit to fill a whole pie shell, I just piled them in the middle and folded over the sides.  Loved it.  The whole thing takes... mmmm, maybe 3 minutes of active time to make.  If that.

How to:
Thaw one package frozen Wyman's Maine Wild Blueberries, right in the package.  Once fully thawed, they produce juice.  Drain all juice, reserving for another use (like letting the kids drink it, it's full of tons of antioxidants) and plunk thawed, drainked blueberries into a bowl.  Pillsbury refrigerated pie crusts work well here (I'm generally a pie crust snob but they are great here).  Remove pie crust from fridge for 10 minutes to sit at room temp while preheating oven to 425.

Mix together 1/3C sugar, 1-1/2 Tbsp. cornstarch, 2 pinches (1/8tsp) salt and 1/4teasp. cinnamon or thereabouts.  Can add a grating of nutmeg too.  Sprinkle over blueberries and fold into berries gently, being careful not to smash.  Unroll and lay out pie shell onto glass pie pan but don't pat down edges to fit into edges of pan.  You can use just a tad of butter or Crisco to grease pan, but half the time I don't.  Dump in blueberry mixture right in the middle and fold up sides of shell to contain.  Bake 10-20 minutes until crust edges are golden brown and blueberries are bubbling.  Remove from oven and cool in pie pan 10 minutes on a rack.  Optional:  Carefully and gently slip a spatula under bottom of tart as though to lift, then position it higher with a prop for better cooling.  Or just leave it to cool, that works too. 
Talk about quickie no-brainer pastry, it's almost criminal that it looks and tastes as though someone took hours on this.

And then there's this Dutch Baby(Recipe is not my invention or unvention)

This is a nice breakfast thing when you want a treat.  No two rise into the same shape.  Some puff up like the one in the photos, sometimes they form themselves into a bowl-like shape.  I didn't photo this one with the powdered sugar and lemon juice (both musts) that you add before you eat it, this is just to show my sis what it looks like when done.  The following size serves one.  To serve two (or a couple kids and an adult), double recipe and use a 10" Pyrex type glass pie dish.  (Not sure how this would come out using metal, it doesn't retain heat the same as glass or stoneware.)

Ready to come out of the oven...  after it has risen into whatever shape it's going to take (varies), edges are browned and crispy, and the center is "set" (which means the center is no longer bubbling).

After it's out of the oven, in more realistic light 

How to:
Stick smallish shallow baking dish or individual casserole dish (mine is 6" x 7.5" interior dimensions) into oven and preheat dish to 375-400 degrees along with oven.  When oven is at temperature, gently whisk 1 beaten egg, add 1/3C half and half to combine and then add 1/3C flour.  Whisk just until smooth.  Remove dish from oven and grease sides and bottom with a half pat of butter.  Enter batter.  Put back into hot oven, set timer for 10 minutes, after which you start keeping an eye on it.  (Kids like to watch it rise.)  Remove when edges are browned and center looks set, like in photos (no bubbling).  It will fall a tad flatter which is fine.  Serve immediately, BUT to serve (and do not omit either of these!) squeeze fresh lemon juice (please, fresh!) all over the thing, like way more than you'd think, especially on the edges.  Then sprinkle a LOT of powdered sugar all over it, and I mean a lot!  It should look like fried dough at country fairs.  Eat with a fork.  It's surprisingly filling.  Goes absolutely GREAT with a chaser of orange juice and coffee after.  Easy clean-up too, it makes no mess to prepare.