Friday, September 11, 2009

Attempt at "Periwinkle," whatever that means

5 oz. scoured fleece from Romney Ewe #1 -- (Lydia's flock in Newbury, MA). I had pulled it into locks at this point. Dey so fluffy... (sqwunch, sqwunch)


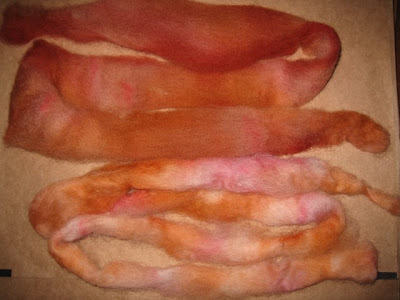
The locks, now dyed. (This was as "Periwinkle" as I could get as a beginning dyer - the tips didn't strike that well, but that may just be the nature of raw lock tips. They lightened the intensity of the yarn a tad, but not that much.)


Locks separated and organized by length, all ready for combing


About a comb load's worth. Though Lydia bred out a great fleece flock, her pasture was very muddy with lots of twigs and other matter, but all that falls out in the combing. Sure makes for a dirty floor though ;-) After combing waste, I'm averaging about a 6-gram sliver...


Poof! This stage always amazes me. How those scoured, dyed and otherwise "handled" locks can open up this nicely. I could just bury myself in fresh-combed poofy fleece!
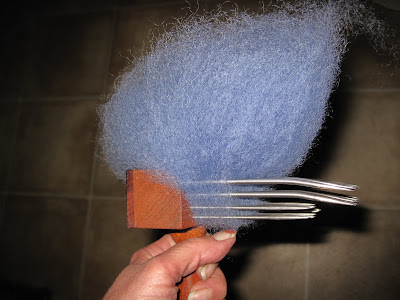

A fully combed load (4 passes) being dizzed off into a fat, airy sliver. (It's way fatter than it looks, I'm guessing most are between 4-5 inches in diameter.)


That sliver now being wrapped into a bird's nest. (This nest I wrapped pretty airy, sometimes I pull them taut as I go. Either is perfect for spinning from though.)


I didn't take photos of the spinning, but you know what a bobbin of spun single looks like. The one thing that I originally had trouble with was plying on my wheel. I was doing that step on my plying spindle but then discovered a somewhat unorthodox way of doing it, and hey, it comes out evenly so I ain't gonna fix it! So here's the freshly plyed yarn, skeined, soaked to set the spin and then a good whirrr in the salad spinner. It's now drying outside (yeah, right in the sun, I'm impatient.)

These next photos represent the color I was after but the actual yarn is not as lavendar-tinted. Quite more subtle, actually.


On its way to becoming a "Finished Object." I LOVE that center-pull ball winder! I've been winding by hand, and this is just soooo much nicer to pull from.


Edit 9/29/09
I left this post at that point up to now on blog, since this was to be a present for my sistah. I've already gifted it to her though, so here's her finished mitts after a final post-knit bath. This was a "heavy-worsted weight" grist spin, knit on size US 7 needles so they took a couple days to dry because they're thick enough to be nice and toasteee. Sistah said she WUVES em! Awwwwww. On my monitor, this looks more intense or deeper than the actual DOS (depth of shade) but the color tone is reasonably accurate. I'd say it came out reasonably periwinkle, eh?

Tuesday, August 4, 2009

Conclusions (Dyeing home-combed, dizzed top)

My dyed slivers from yesterday dried, and I just spun some from that lot AND some from my first lot, all in compatible colorway. I not only wanted to test spin what I dyed yesterday with the new step added to the home-combed top before dyeing, but also spin some of that and some from the lot before that didn’t have the extra step, to get a total on-the-spot comparison.

HUGE difference. HUGE. To keep it straight, the first lot of hand-combed, dizzed top I dyed, I just put my fat, airy slivers (and wrapped "airy" into bird’s nests) into mason jars “as is.” The second lot, same size bird’s nests, I first unwrapped the nests and re-wrapped them into new bird’s nests, but this time pulling steady tension on the fibers (staying within staple length, but pulling pretty firmly) in order to smooth it out and make it more dense.

In spinning the first day’s lot… definitely some felting went on in there. I can pull it out, it’s not that much felting, but I do have to pull it out as I’m spinning. I had to use a much longer draw. The second day’s lot? It was practically like spinning commercial top! It slipped through my fingers, I didn’t have any sense of tangled fibers within. Spun smoother. And easier.

So for me, I am now pretty willing to go ahead and comb undyed fleece and dye it after. But for sure, use a large-holed diz (maybe even larger than the 3/16ths hole) and even though it's typically super airy, THEN wrap it into bird’s nests with tension on them. I mean, when I re-wrapped those slivers around my fingers yesterday, I did not wrap loosely like you normally would a totally airy sliver. I wrapped it tight, so I was dealing with quite a solid density of fiber. I mean, there was actual shine to it.

Here are some photos. I think you can see the difference.

The two together outside


The two together, different light, inside


Here's a close-up of the 1st try (with the fiber left airy, right off the diz but bird-nested before putting into mason jars).


First of all, the above ended up drying as WAY thinner top than it started. (These are exactly the same sized diz-ing). What happened, I'm convinced, is that by NOT pulling it into a denser, condensed sliver, it did its own condensing in the dye bath. That enabled the fibers to hug together however they landed. And, of course, it dried in the same self-condensed form it took condensing on its own when floating in the dyebath water. The result was, in effect, some felting.

Now here is a close-up of the 2nd try. Any condensing that was going to take place, I did prior to putting those bird's nests into the mason jars and pouring the dyebath into them (same exact method as above). I did not do any attenuating! I simply pulled the sliver flat and smooth by staying within its staple length as I RE-wrapped it from its airy bird's nests into smoother, condensed bird's nests.


Closer... As it dried, it fluffed right back up BUT! with the fibers still aligned.


Closest. You can see the alignment of the fibers here. Pretty darned straight! The fuzzy part you see here is not felting, just a thinner spot or an end. This spun up like butter!


Color Variation for blending 3 colors together:
Since I did get way too little color variation (used 3 colors just like originally on Dye Day (see that post) when I was using commercially-combed top, this could be due to one of two things. First, I used more dye powder here than I should have, that can cause mud. But secondly, and I'm sure this had something to do with it even if the dye amount was too much... it's standing to reason that if you want a blended multi-colored top out of mason jars (as opposed to the colors just mixing) then I already know you have to pack the jar pretty tight. Well, with hand-dizzed top, even if you condense it as above, it's STILL going to be a looser, less dense top. So that's telling me that MANY bird's nests have to be crammed in that jar, one on top of the other... like a LOT. Whereas with commercial top, you can pack it so a poke has one degree of resistance, it'll take some experimenting to get the same amount of fiber packed in with hand-dizzed. I'm now thinking to help in that, it would make sense to wad some screening onto the very top of these hand-dizzed bird's nests to hold them tighter than I suspect they'll be able to remain otherwise. I know that on both days' experiments, when I was done steaming, the fiber was popping out of the jars somewhat. That didn't happen with the commercially combed top. It started dense, and just got denser when wet. So something artificial added has to hold this down tight. A pusher of some kind.

Monday, August 3, 2009

Dyeing hand-combed, dizzed slivers

I used a 3/16-inch holed diz for the undyed slivers. Fat slivers. Still airy as is typical of non-commercial combed top, but I do put an ever-so-slight twist in them when I wind them into bird's nests. These happen to end up about the same or a little larger diameter as a quart size mason jar. (If using 2-3 little piles of dye in the mason jar, use small-mouth jars). I just stuck one in on top of the other and pushed them down. In this case, I packed a little too tight because I do have some white areas, but I'll take it. It's okay for a first try.

One thing I'm discovering TODAY (after the fact) and it surprises me I didn't notice this before. Hand-dizzed slivers are so airy that they look extremely delicate. Well, they ARE. However, that's in their airy virgin, untouched state, right off the diz. Once you start bird-nest wrapping one, however, if you stay within the staple length with your wrapping hand (the wrap-OR, not the wrap-EE) you can put a fair bit of pulling pressure on that sliver and make it a LOT more dense!

Yes, I did get some extremely minor "felting" action, but very minor. I'm now thinking that if I bird-nest these little suckers with that pulling pressure on them I discovered this morning, then the sliver itself will be way more dense and a lot tougher under the stress of dye-handling. In fact, I'm going to experiment with this pulling more. It was almost feeling as though if I were to pull a little more, it wouldn't drift apart (the big fear) but it would smooth out and just be a whole lot more like commercial top. Or let's just say a worthy step, at least, in that direction.

Whoa! This photo picked up a whole lot more saturated color appearance than I got. The real top is actually more caramel color base, then take it from there. Nothing in it is this INTENSE.


This is the relative size of my slivers. These happened to have been dyed in the fleece state, then combed, but size is the same.


The perspective is off. These look smaller than they are. Some of them actually are smaller. The big one is more like my typical size. This is in its fluffy wrap state, I hadn't discovered the pulling and smoothing capability yet when I wrapped that one.


By the way, these colors were under-saturated hues of Teal Blue, China Jade, Blue Spruce and Avocado (Country Classics by ProChem) in the order of intensity down to lightest color, with only one small bird's nest of the Avocado combed so far. All done in mason jars, then steamed in a canner. I'm thinking these alternated in the spinning, then the single plyed on itself however it lands (not Navajo only because I don't know how to do that yet) will make for some pretty yarn.

***** SECOND TRY ******

1. Full Intensity Saturation - same blues and greens (one color each jar)
2. Tried again for target rust/caramel/yellow colorway
3. This time I unwound my bird's nests from their fluffy wound state and re-wound them, pulling the fiber MUCH tighter and smoother so it would be more condensed. (This is a matter of starting out with fat slivers to begin with, dizzed as densely as I dared without causing a bottleneck bunch-up, then holding hands close enough together not to violate staple length, pulling the fiber tight and smooth, and re-winding into far more tightly condensed bird's nests.

Wet "blobs" - VERRRRRY little handling at this stage. All I did was plop them into the salad spinner, then took the picture.


After salad spinner -- It just naturally separated into sliver form. Still want to handle this very carefully. But it does stay together in sliver form! Yeeehaw.


It lets you carefully pick it up, drape it on a hanger to dry, and stays together. This whole trial WITH the bird's nests re-wrapped so the fibers were pulled tighter really seems to be a whole lot better. The fibers within the sliver were definitely less disturbed. Note even the parts where you can see the white hanger showing through. Those were likely thinner to begin with, but yet there's still integrity there.


Here was my setup (only workable in good weather obviously). What I didn't move off the forward bench were a container of inside/outside ant spray and another like container of weed killer. (Those are not dye equipment.)

Tuesday, July 28, 2009

Combs photos

I exchanged the big 2-pitch Valkyrie's for a set of his Mini combs, and bought a 2nd set for Jenny, both with stationery bases. The big Valkyrie's were just too much comb for my shoulder and wouldn't suit the finer fiber I'm likely to be working with. I LOVE his Mini combs!

2 pitch, tines approx. 3/16ths dia (maybe a smidge under), set 3/16ths" apart, 4 inches long, WITH bend, super well balanced and not heavy. LOVE these combs! Amazingly, the least expensive out of all of them and they'd be hot contenders if I could only have one set.


Here are the Indigo Hound English combs. 5-pitch, "Fine" (as opposed to "Standard" or "Regular)". Vicious looking little bastards. With these, and the non-visibility of the back tines from where you're working, it's not a matter of whether you're gonna poke yourself and break skin, it's when.
Gotta be incredibly, overly, ridiculously careful with these. But I am definitely going to renew my tetanus shot. Soon! I've already poked a couple times, just haven't broken skin yet.


Friday, July 24, 2009

Making heads or tails of a fleece?

03: Whole Fleece spread out as best I could keep the given shape. It's easy to assume the head is A and the butt end is D. However if I stood back looking at it from the side (B and C closest to me, A off to my left and D to my right) I could almost picture how the head and butt end COULD be on the B/C sides. I simply don't know what I'm looking at. Or for.

Note: The fleece IS longer from A to D than from B/C to B/C, if that helps.


04: This is a close up of A on the main photo.


05: This would be from the left side of B, you can see where the smooth fleece begins and match up this photo with the "whole fleece" photo.


06: This would be about the center (around B)


07. This would be between B and C or it would be C


08: Texture break - comparing adjacent locks


09: Would be from other side of C


10: Would be from one side of C


I skipped numbering "11" somehow so there are two possibilities as to what we're seeing. I'm listing both as were written in the notes.

11/12 (likely this is A locks up close)


12/13 (A locks up close OR B locks up close)

Thursday, July 23, 2009

Vacuum Pack Fleece Storage

I'm slowly working my way through scouring four Romney fleeces (40 pounds of fleece in the grease) and separating it into locks according to fine-ness.

A fail-safe storage system is becoming pretty important to me. Moths, moisture, and also the space that gets eaten up storing fleece which is extremely fluffy, hence a space hog.

I'm experimenting with vacuum-packing. This first is with my Foodsaver. I have Space Bags at the ready in case this works well. Based on what I'm seeing, I think this might be a great solution, both to the potential of moths and also to moisture. Now add it taking up virtually no space.

Experiment: A little over 1/2 oz. of scoured fleece. Clean, but still uncombed, so you'll see twigs and other vegetable matter in it at this stage.


Here it is vacuum-sealed. This Foodsaver bag was 8" long by 11" wide. The fleece was stacked in the bag 3-4 locks deep on one side, not on the other. Pretty much as you see it above. The thickness of the vac-sealed bag was maxiumum 1/8". It was by no means packed to capacity but way thicker packing would only add a little in vac-packed bag thickness.


Here's after cutting open the bag, letting air in. Fleece untouched.


Here's the fleece as it came out of the bag, I haven't yet touched the locks.


Here's the locks, as I would lash them onto my combs. They look exactly the same as what I've been lashing onto my combs after scouring. And I didn't need to do anything different than I would have gathering them off the drying sheet.


My conclusion? It was only stored this way overnight but I see nothing whatsoever about time being a factor here. No moisture can get to it, there's minimal if any air in the bag. Moths wouldn't smell it.

Sunday, July 19, 2009

Dye Momma, Dye!

Oh, man. I am just so freaking excited I can't see straight! Yesterday my new spinning group (new to me, old to them) had their annual Dye Day. It rained some, but no big deal. It cleared up, and for a while was purrrr-fect weather. It started getting hot not long after lunch, but by then we were winding down.

Emily, the woman who kindly contacted me through a fluke of finding out there was another spinner in town, just to let me know there was a local spinning group, pretty much took me by the hand, knowing I knew ZERO about dyeing. Nothing. Nada. Zilch! I'd brought a total of 8 oz. of scoured locks (four very sadly too-loosely packed sausage rolls wrapped in tulle that all but came apart in the process) and also 2 partial balls of Romney commercially-combed undyed top. She showed me the mason jar method, and that's pretty much what I used for the top.

OMIGOD! LOOK AT THESE! I can now DO this... myself!

My very first. AND absolute favorite. A trilogy of plum, caramel and yellow


And my old standard color combo that I just can't resist. I just had to see if I could get it myself.


But there isn't enough of it so I can combine it with another for this. Either spin some of each alternately for one consistent colorway or spin them separately and stripe them (same colors, opposite dominants).


And I decided to break my boycott of purple 2 weeks ago. This is my first purple thing. I've always hated purple. But dammit, playing with fiber just makes every color something you just have to have!


Here it is with some of it unbraided.


And then there's this. Not really enough to do anything with, but okay, a few stripes in something, maybe even the purple. GO MAD!!


And even this, which isn't my favorite. But it's just fine!


Dye Momma Dye! Here it all is on the washing machine. I have a feeling it's not entirely dry inside, and I probably shouldn't have braided it yet. But such eye candy!!


The loose locks? Well, the locks we just dyed in vats (solids). A "hunters beware" type orange, a knocked down more golden orange and flat out serious, historical royal family, Joseph's Coat type purple. The fourth? THE most amaaaazing hybrid of the orange that I think we overdyed in some sort of salmon, and it came out either an intense watermelon or a perfect balance within coral. But Jenny came unglued over that color. I mean, it was like showing something shiny to a blonde. She just gazed into it, or maybe through it, but she just looked totally hypnotized by it, so I gave it to her. (I kept one lock just in case someone might someday know how the heck to get that color again.) But she's working with something in an almost companion color and I had the feeling she'd work this into that.

What a FUN day that was. Sheeesh. I hate to say it, but my treasured canner is going to be forfeited away from food use VERY soon. When I go to Hanover at the end of the month, I'm hitting the LYS (an hour from here) and it's going to be dye buying day, because no WAY am I done with this!